You're reading for free via A Osman's Friend Link. Become a member to access the best of Medium.
Member-only story
Going from User Story to finished prototype in one week

Building an application is like a marathon; building each feature is like a sprint.
The goal of each sprint to pick one or more features (user stories) to work on. Ideally, the feature should be able to be an application on its own. For example, a user story for a budgeting app could be:
As a new user, I want to set up my budgeting profile
If we develop only this feature, a user should be able to open this application and set up their profile (e.g starting cash, income, expenses etc.). At this point, the application will do nothing else, but it will take a new user’s information down, make sure it’s valid input, and have that data ready for whatever feature you build next.
When you finish each sprint, it’s like having another Lego piece, until you complete enough sprints to build your MVP (minimum viable product).
Each Sprint comes in three stages:
1 — The Sprint planning
2 — The Sprint
3 — The Spring Retrospective.
Sprint Planning
Before the sprint can start, double-check that each user story you’ve chosen to work on fits the INVEST method from Part I.
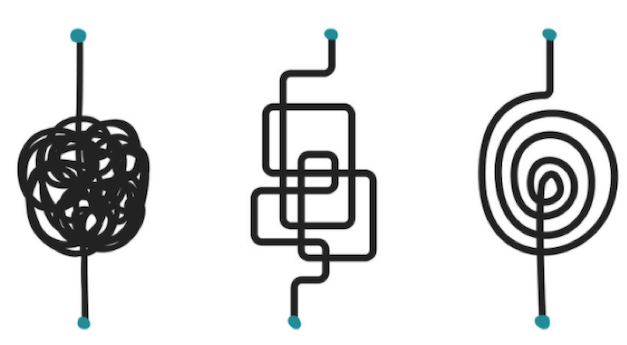
As discussed in Part I, the user flow diagram is a rough sketch that helps us create our user stories. During the sprint, we will turn the user flow we made into an actual wireframe, then polish it up to make it a prototype. But before we begin that process, we need to refine our estimate and create acceptance criteria.
Estimating
When you were creating your user stories, you loosely estimated how long you can build a prototype for each story. This is the time to refine that estimate. The first few sprints will be hard, if not impossible, to estimate accurately until you get adjusted to the work involved. However, your estimates become more precise after each sprint, until you get to a point where you can accurately estimate how long the rest of the application will take.
Acceptance Criteria
A feature is done when all the stories you chose to work on are done. To know when a feature can be considered as done, acceptance criteria need to be created before the feature is built.
Creating these criteria first is an important part of testing to avoid bugs. It also has the added benefit of guiding you or the developer you hire to stay on track to achieve the goal of that feature.
Here is the acceptance criteria for the first screen in our user flow diagram.

There are two ways to test this acceptance criteria: manually and automatically. Manually is after the feature is built, Automatically is when you write code to do the checking before its even built.
Test Inputs
However you do your testing, you need test inputs. With the user flow sketch above, we determine the inputs that cover anything the user could enter or press:
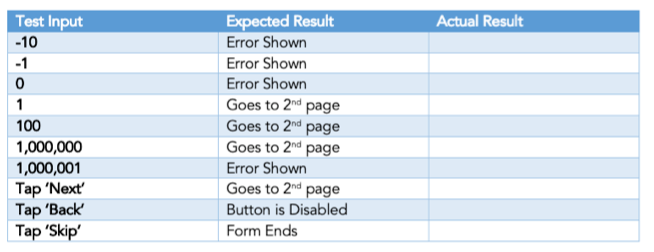
Ensure the actual result after the feature is built matches the expected result. The more comprehensive your test inputs, the less bugs you will face.
Keep edge cases in mind when choosing test inputs. If all your tests pass, you can be pretty confident you will be getting valid data when you go to build other features like the database. Having this confidence is important because you might not come back to the code written in the first sprint until the 10th sprint or later. You should also be able re-run the same tests at that time to make sure everything is still working as expected.
The Sprint
To get our first prototype, we create the skeleton of the app, then add the functionality and UI afterwards.
It’s important to separate how things look from how they work. The skeleton allows you to focus on the layout and structure separately from the functionality and UI. There’s no hard rules on what makes up your skeleton; mine consists of a wireframe and assets. Together, these make up our prototype.
Wireframe
The wireframe is the backbone of your prototype. There are two main ways to create one:
• Using Code
• Using Design Software
Using Code
You can code your wireframe right onto your shell, and add the functionality right away (e.g. navigation, error checking, etc). This has the added benefit of forcing you to separate your UI from your code. Since you know you will be changing your UI, you will have to create your functions, inputs and outputs to be independent.
Using Design Tools
If you are not a developer, then you can design your wireframes using many design software. Most design software have a prototype mode that lets you use your prototype as an app on a phone (or browser) without any coding (e.g. Invision, Marvel etc.) and they come with templates and UI kits to help you get started.

This is also a good chance to get user feedback on both functionality and usability. It’s always best to test with your users as early and as often as possible. If the goal is a high quality app, then it helps to have a good understanding of the activities that make up user testing.
Assets
Assets are considered anything that gets loaded by your application for display. This includes (but is not limited to):
- Images
- Fonts
- Text
- Icons
Images
Your images will come in various sizes and shapes, and will need to fit various screen sizes. You may have several versions of the same image for different sizes, so keeping them in a separate folder from the start helps you stay organized.
Text
All the text you use in your application should be separated from your code from the start. If you have your text coded right into your application, translating your app will be very difficult and expensive. On the other hand, separating your text allows you to translate your app into many languages extremely easily.
If you are not writing your own code this is especially important to avoid back and forth during development, and costly minor text changes down the line.

Icons/Fonts
There are several paid and free websites that specialize in providing high quality icons — Font Awesome is probably the industry leader for Icons. Of course, you can design your own icons too. As for fonts, the ones you decide to use can have a big impact on usability, so fonts and general typography tips are topics worth researching.
The UI
UI design is a discipline in and of itself. It does not have to be done in the same sprint as the feature. In fact it may be better to have a few features in your prototype before you begin to improve your UI. This is because during the first few weeks there will be a lot of change as you refine your requirements and layout.
The first step to designing a good UI is getting inspired. For inspiration, I check out:
- Sites like Dribbble, Behance, Pinterest etc.
- Apps I enjoy Using
- Apps I will compete with
- Apps I don’t like
- Highly rated apps
- Low rated apps
Taking screenshots, add all your inspiration in one file called a moodboard.
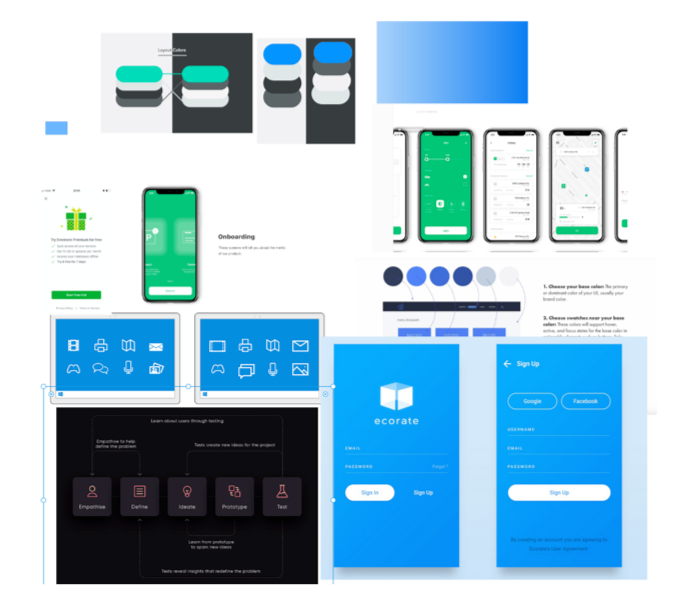
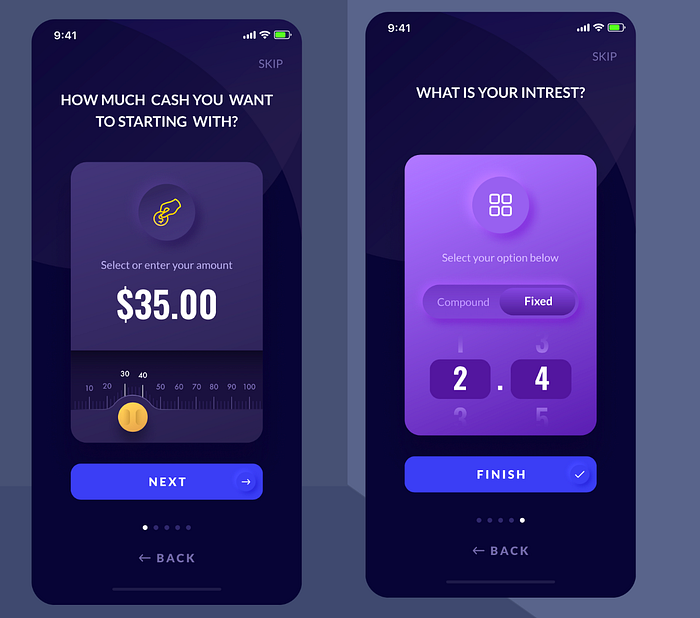
Once you’ve got an idea of what you think looks good, refine your wireframe. For example, with the inspiration from my moodboard, I refined my wireframe even further and came up with the final prototype for this feature below.

For your application, this may be good enough (or you may be able to come up with a better design). In any other case, a UI designer can help go from prototype to finished product.
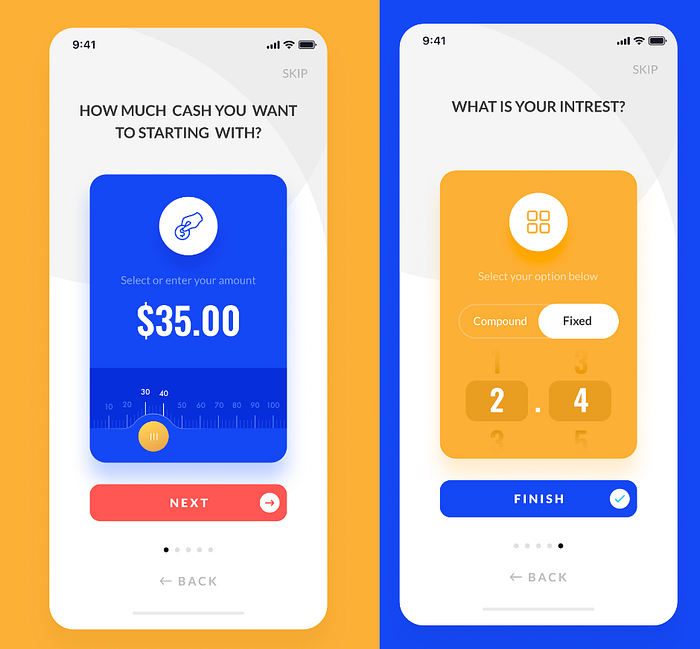
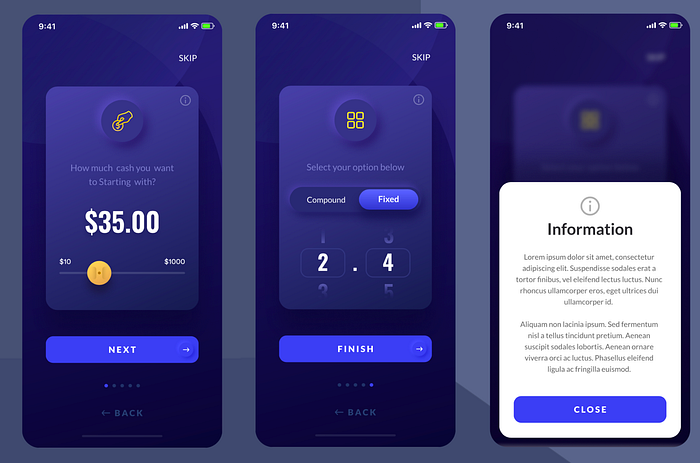
We asked a designer on Upwork to provide a dark and light version of our prototype.
The cost of developing this ended up being about 4–6 hours. However, this could have easily taken 3 to 4 times that length if we had not:
- created the requirements,
- drew the user flow diagram,
- created the wireframe, and
- produced a refined prototype for the designer.
Some back and forth is unavoidable; in this case, we asked the designer to:
- add an info button,
- make the dark color lighter, and
- make the screens match in color and theme
This is the final UI we settled with.
Sprint Retrospective
You’ve ran your tests, and have gotten them to all pass. You have a good idea how the feature will look when completed (if it’s not already). And you have your prototype (or maybe even the finished feature). You can now move the feature to the “Done” pile. To complete your sprint, look back on the sprint and ask yourself the following questions:

After two sprint retrospectives you might notice a lot of issues with the framework, library or designs you are using. Recognizing these issues and switching up your tools and/or processes early ultimately improves the quality of your application, and saves you time and money. You will also get better better at problem solving and finding creative solutions, especially if you’re working as part of a team. Or you might just realize you work better at nights.
Regardless, take your findings and make actionable comments you can use in the following sprints.
Conclusion
You’ve just seen how to turn a user story into a working prototype then into the final design. The application doesn’t do anything meaningful yet, but it’s an important Lego piece in our final structure. It will be presented to new users, and then connected to the database in future sprints .
To recap the steps, the skeleton makes up your prototype, and adding functionality and UI refines the prototype until you have a completed feature. Do this over and over again until you have a completed application.

If you’re not a developer, leave the functionality column out in the first few sprints. Once you have a prototype with more features and a final UI, you can bring in a developer to start building the functionality using the skeleton and UI you provide. The final part of this guide is will be how to hire and work with contracted developers and designers, and best practices on keeping cost down and quality up.
Next up, however, will be about taking advantage of APIs and Cloud services (trust me, they’re simpler than they sound) to reduce the work you need to do — without sacrificing quality.
Further Reading
Beginner’s Advanced Guide to building an app — Part I
Agile
Sprint Planning
Wireframing
Testing
7 Tips for writing Acceptance Criteria
UI design
Complete Beginner’s Guide on How to Learn UI Design
iOS — Human Interface Guidelines
Android — Material Design Guidelines
User testing