Developing an experience map, A to Z.
Investigating peoples’ experiences with home monitoring solutions do define product vision.
Last year I joined the product team at Cherry Home — a startup developing an AI home security system. At the time Cherry had developed the advanced computer vision and AI technology and started crafting the product story — we had to figure out what our product was going to be and who it was going to serve. To do that, we needed to identify the unmet customer needs and see which of them we could address with our tech and do it better than the competition.
To identify and communicate these needs to the whole Cherry team we decided to conduct quantitative (i.e. online surveys) and qualitative (i.e. in-depth interviews) research on the end-to-end experience people had with existent home security solutions and visualize them via experience map.
My approach to experience mapping consists of three steps: Research, Map, and Communicate. In this story, I’m going to walk you through each of them.
1. Research. Collecting real customer data for experience map.
Experience maps aren’t based on guesses and assumptions; they are based on data acquired from real people via surveys, in-depth interviews, observations and desk research.
At the time we had already surveyed about a hundred people and had discovered a lot of “WHATs”, i.e., what products on the market were the most popular and what features were the most used ones. What we were missing were the “HOWs”, i.e., how people buy and install home monitoring devices and how they use them over time; and the “WHYs”, i.e., why they decide to buy them in the first place, why they choose one product over the other, and why they use certain features and ignore the others. In-depth interviews and (surprisingly!) desk research shed light on these questions and provide invaluable input for your experience map. So, research is an absolute must and here’s how I approach it.
— Recruiting respondents. You need people to interview (duh!). Finding people who: a) meet your recruitment criteria, and, b) are willing to talk to you, is essential, but, alas, a time-consuming step. In my experience, it may easily take a couple of weeks or more — so plan for it. I can name three ways to recruit that I have tried:
- Using an agency. It must be the simplest way out there — you tell the agency who you want to talk with, and they provide you a list of candidates to choose from. The downside — it costs. In countries, like the US, it costs a lot, so unless you have a generous budget for research, you probably want to recruit by yourself.
- Running targeted ads on Facebook. You create an ad, specifiying demographics and other criteria of the audience you’re looking to talk to, promise them some reward (e.g. a 50$ Amazon gift card), run the ad for a week for a 100$ and wait for people to reach out to you. It kind of works, but, in my experience, the conversion is very low, so I never rely on this approach alone.
- Reaching out to personal connections (my favorite!). Think of people you know who meet your recruitment criteria, and ask your friends and teammates to do the same. Reach out to them, ask for an hour of their time — they rarely say “no.” Once you sign up first respondents, ask if they know anyone who’d be willing to talk to you — this is called a “snowball recruitment” and also works well.
— Conducting desk research while recruiting respondents. As you’re arranging the in-depth interviews, it’s usually a good idea to carry out some desk research. It helps you immerse yourself into the subject and gives you a first idea about the stages of customer experience you’re investigating. The good news is that doing desk research is not difficult. I read product reviews on Amazon and watched unboxing videos on YouTube to learn how home monitoring solutions work, what customers like and dislike, and how they use them. I then laid out and interpreted these initial findings on a real-time board, making a solid foundation for the experience map to come.

— Preparing discussion guide. It’s absolutely necessary to create a plan, which you’re a going to use during the interviews. You don’t have to follow it word for word, but it’ll help you lead the interview in the right direction and make sure all important questions are answered. At this point, I have completed the desk research and made a list of experience moments, into which I wanted to get a firsthand customer perspective as I thought there might have been some interesting opportunities for our product. With these in mind, I imagined and outlined the way the interviews could unfold.
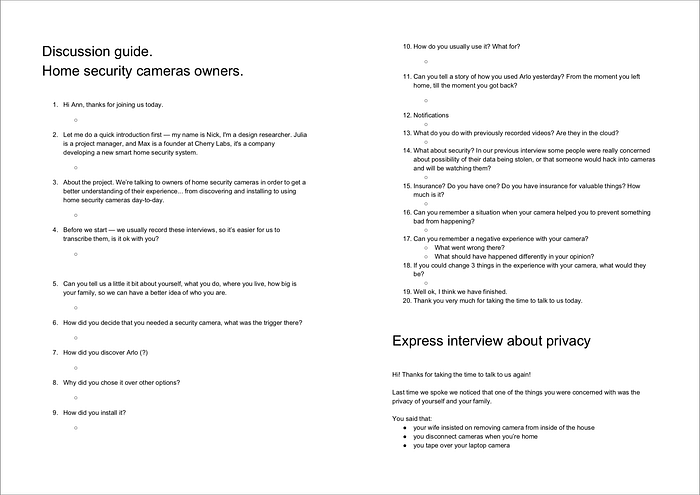
— Conducting interviews. No matter how you do your interviews, in person or via video call, make sure you take notes. Never rely on your memory — it will fail you. Taking notes and talking at the same time is tricky; that’s why it’s easier to conduct interviews with a partner. One of you leads the interview, and the other takes notes and makes sure nothing is missed. That said, oftentimes, I conduct interviews all by myself; it takes practice but is doable. What I do is duplicate a master copy of the discussion guide and use it during the interview to type my notes in-line.
2. Map. Visualizing research findings.
—Interpreting findings. It’s best to analyze and interpret the findings within a day or two after the interview, while your memory is still fresh. Refering to your notes, write down on stickers the responses and observations that you feel are going to be insightful, i.e., capable of sparking ideas within your team. One sticker means one response or observation. I like using direct quotes as they make the experience map more relatable, i.e., easier for your team members to imagine themselves in the customer’s shoes.

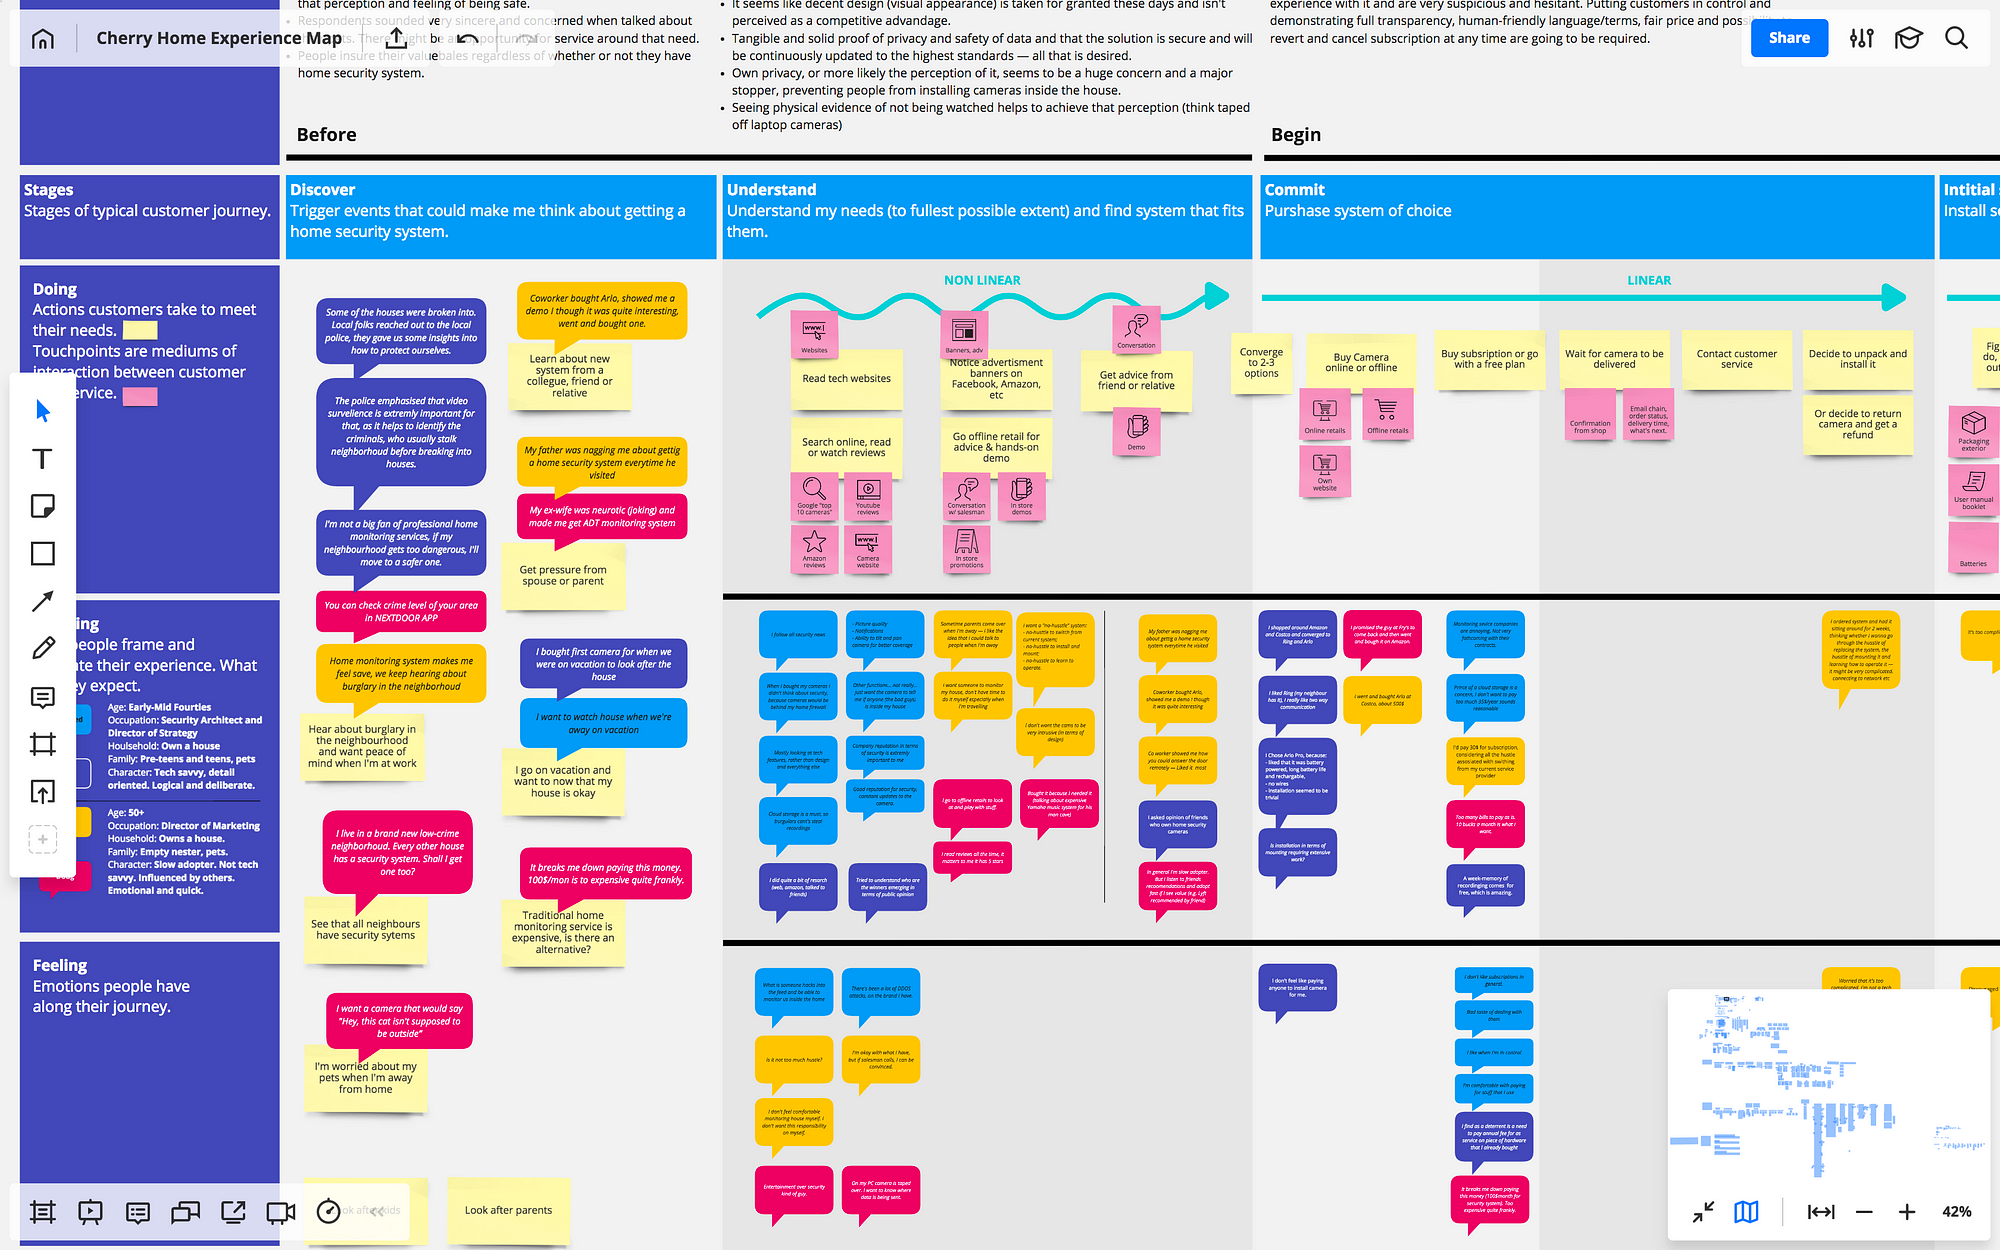
—Outlining experience map (Finally! I know!). Once you’ve got the notes from your interviews interpreted and written down on the stickers, you can get to building your map. Depending on the project, you can either start working on the map right after the first interview (i.e., when the customer journey in question is more or less known and clear) or wait untill all of the interviews are finished (i.e., when you’re investigating something that’s a complete mystery to you).
In my experience, every map is always a little (a lot!) different from the previous one. Whenever I begin working on a new map, there are so many unknowns that I can never be sure how exactly it’s going to shape up. Therefore, to deal with this ambiguity, I start with a universal structure — the bones of a map — and then adjust and bend it as the project unfolds and more input flows in.
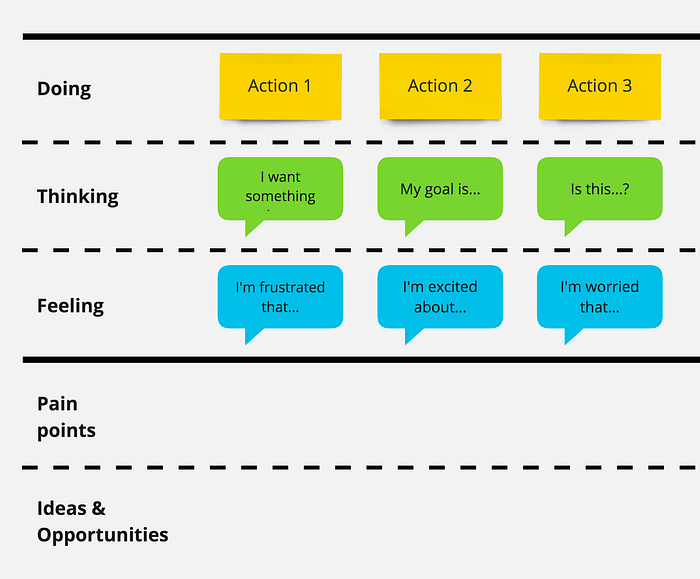
Here’s the structure I base all my maps on:

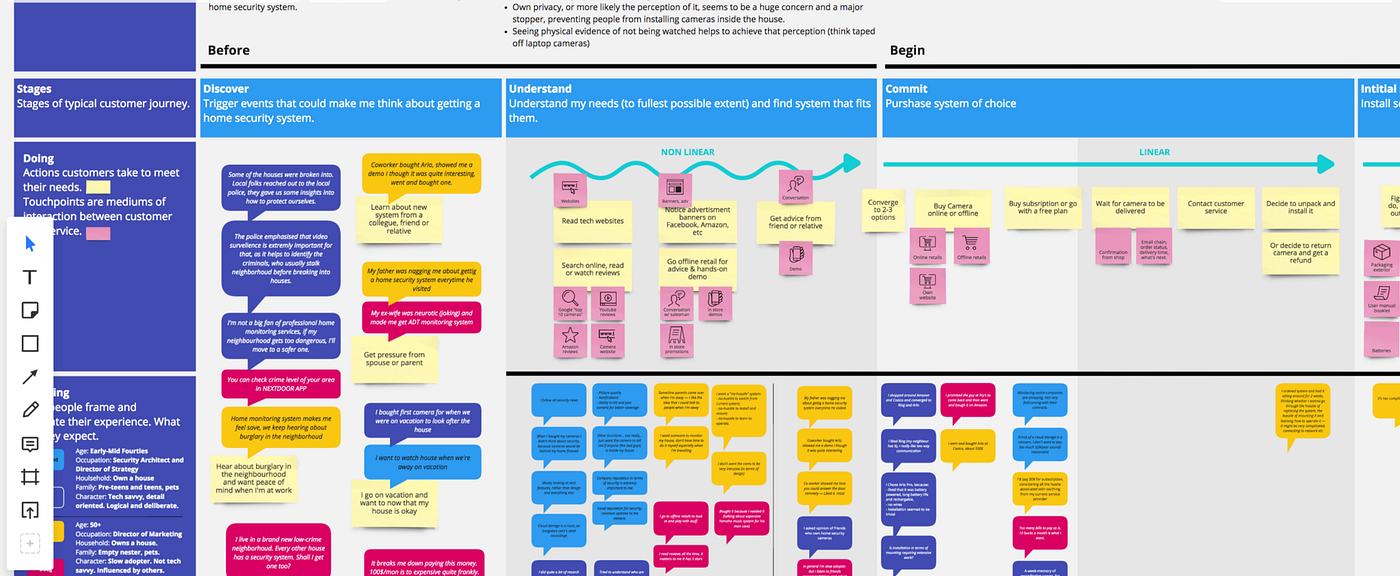
1.Columns — the lifecycle of product or service experience. These are the typical stages customers go through with most products and services.
2. Primary swim lanes — the customer’s actions, thoughts, and emotions. These are the facets of the experience you want to tell your team about.
3. Secondary swim lanes — you and your team’s interpretation of everything from the primary swim lanes. Typically, these are thew pain-points and unmet needs identified, followed by ideas on how to address them and new design opportunities.
— Building experience map.
- Fill out the “Doing” swim lane. Based on the desk research and interviews, break down the lifecycle’s stages into more detailed steps — i.e., the actions customers perform and the touchpoints they use. Strike the balance between being overly specific and too vague. Yes, I know how this sounds, but you will figure it out. :) Just keep asking yourself: “Is this relevant for our product?”, “Are there any opportunities for us at this step?”, “By looking at it, are my teammates going to learn anything they don’t already know?”
- Fill out the “Thinking” and “Feeling” rows. Paraphrase or map out the direct quotes from your interviews under the corresponding actions. This is the “empathic” component of your map, something that helps your team see what the subject in question really looks like through the eyes of the customer. This is what sparks ideas!
Do this for each column, and voilà! You have a draft of your map (don’t worry, a useful map stays draft forever!) — now it’s time to bring in the rest of your team and kick off collective discussion.
3. Communicate. Telling experience stories to inspire ideas.
It’s always good to remind yourself WHY you do mapping in the first place. Creating a cool-looking map, although it might be tempting (Trust me, I know!), isn’t the goal. The goal is to ignite the idea generation process within your team by telling a compelling story about the actual experiences people have. So don’t waste time beautifying your map and start showing it to your team as early as possible to let the ideation begin!
—Kicking off conversation around your map with the team. If people aren’t personally involved and invested into something, they tend to disregard and ignore it. So if you don’t want your team to glance at your map once and forget it forever, if you want your efforts to be actually fruitful, you must make the team your co-authors. You must engage them into building the map with you. Here’s a couple of ideas how to do it.
- Walk the team through the experience you’ve mapped out. Describe customers’ actions, thinking, and feelings at each step. This is when direct quotes from the interviews trigger empathy and make for a great story.
- Discuss pain points and unmet needs. Start by vocalizing the ones that you have aleady spotted, and then ask your team one by one for their input based on what they’ve just heard. As they speak, write their comments down on stickers and plot them on the map. It’s extremely important that your teammates see their thoughts being noted and recorded.
- Talk about opportunities and potential solutions. In my experience, a good real-life story always sparks ideas, even when your team is very experienced in the subject and seems to know everything about everything. Brainstorm quickly how you might solve the identified problems and help the unmet needs. At this point, high-level ideas are enough; don’t focus on their feasibility, just write them down, plot on the map, and revisit them later.

Here you go! All of a sudden, your team is co-creating with you, which means there’s a good chance they will keep using the map in the future to inform their decisions. As long as you feel that the team is learning something new and generating ideas, continue developing and discussing the map.
We used our experience map to facilitate numerous discussions about what Cherry Home could have been and what peoples’ needs it could have solved. As a result, we generated many high-level product ideas and created the first version of our product story. Today, half a year later, we keep referring to the findings and ideas captured in the map to inform decisions on the product features and the overall experience.

Takeaways
- There isn’t one right format or method of building experience map, and, at first, everything might seem a little ambiguous. That’s okay.
- Just start with something, run with it for a while, and figure out what works for you, your project, or your team.
- Whatever method or format you pick out, keep in mind that it is someone’s approach rather than a universal formula. Be flexible and make it yours.
- Don’t work on the map in isolation and then just roll out the final thing. Your team members won’t use it if they aren’t involved in building it.
- The process of co-creating the map with your team is more important than the deliverable.
Originally written for Realtimeblog

