Getting started with animations in Adobe Xd
Animations… For a long time, these really were a mystery to me. I didn’t know what to use to make them, or how to use them, or, really, anything about them. So when the time came that my boss asked me to design some nice animations for a website we were building, I was lost.
At first I tried Adobe Ae. It’s the right tool, at least for creating nice motion graphics, and to the best of my knowledge was the best route to take to build out a nice looking animation to get the concept over to the developers. But after fiddling with it and watching a couple hours of tutorials I was still only getting very basic animations and not ending up with the idea I was going for.
I was already using Adobe Xd to build out the design of the website. In the middle of messing around in Ae, a life saver popped up. An update, which included improvements to Xd’s Auto-Animate feature. At last, something that made it overly simple to create something convincing without having to add yet another tool to my workflow!
So, sorry for the long intro. Let’s dig into the basics of Auto-Animate to show you some of what you can do!
Step 1: Create a new document

I set up a new project with a custom size. When you select this option, a new project opens up with no artboard in the window. Select your “artboard” tool by using the keyboard shortcut “a”, or in the tool panel on the left.
Click and drag out a new artboard, don’t worry about the size. Now, in the properties panel on the right, you should see options to change the artboards width and height. Set this to 400px wide, and 40px tall. You should end up with the image shown above.
Step 2: Make a square
Go ahead and create a square in the center of the artboard. Using the “R” shortcut, select your rectangle tool, then move your cursor to roughly the center of the artboard.
There’s a couple keybaord shortcuts you can use here:
- Shift: Constrains the dimensions to scale evenly, in this case making a square. This also works with the ellipse and polygon tools.
- Option (alt on windows): This will scale the element from the center of your click, expanding all sides out from that point.
Hold both of these buttons down, and drag outward from the center of your artboard. You should end up with something like the image below.

Step 3: Set up your next artboard
Hold down the “option” key (alt on windows) and click the artboard name, and drag it down below. You should have two identical artboards now.

So far, we’ve been working in “design mode”. Let’s switch into “prototype mode” by clicking the option in the top left corner of our screen. This is where we wire things together for interactivity. It’s also where we gain access to the amazing auto-animate feature.
Click your first artboard. It will highlight it in blue. This shows that the entire artboard is selected as our trigger. Rather than that, let’s click on the square within the artboard.
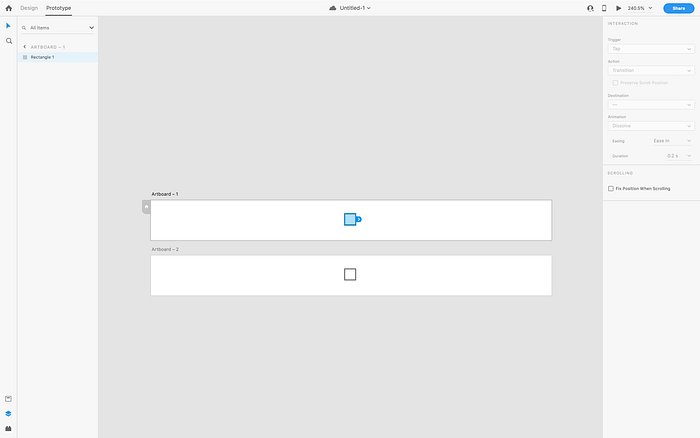
Now drag the little blue tab onto our other artboard to link them together.
Now, you can see in our properties panel we have all the options for the desired trigger, action, etc. Now, if you were to auto-animate this, nothing would happen. That’s because the artboards are identical. That leads us to our next step.
Step 4: Moving the square
The most important basic principle behind auto-animate is that it combs through the artboards you have linked together, and finds any changes in the positioning, scale, rotation, and shape of groups and components that are contained within them. Right now, there is no change between our artboards.
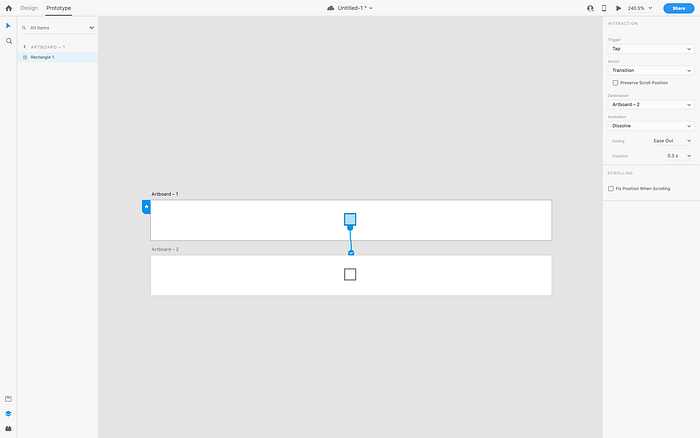
So, let’s make one. Click and drag your square to the far left of the bottom artboard.

Now, auto-animate will see that the box has moved. So let’s get the transition set up in the properties panel to our right. Leave the trigger to “tap”, but for action, we are going to choose “auto-animate”.
Now at the top right of your screen, click the play button. Click on our square and watch the magic happen!

Pretty simple right? Auto-animate played a transition from our previous artboard, to the new one. It saw that the square moved, and animated that object to it’s new position at the speed defined in the properties panel.
Now, here’s another little fact about auto-animate. It can only detect the change to the square as long as the two squares have the same layer name. For example, if you look in the layers panel on the left of the screen, and click between the two different artboards, you will notice that the square is called “Rectangle 1” in both. If you were to change that on one of them, auto-animate will no longer transition the position of the square. This is because it now sees them as two different objects, thus the position hasn't changed. Auto-animate will think that you have deleted the first rectangle, and created an entirely new one in the second artboard.
Put simply, do not change the names of elements, groups or components you wish to animate between artboards, unless you rename that element on every artboard on which it exists!
Conclusion:
Yes, this was a very basic overview. It was really just meant to explain the basics of auto-animate and how to get started. In my next story, we will consider how to add different easing, timing and other shapes to create more complex animations and see how to use those in a more realistic use case. Thanks for reading, and please let me know if there are changes I should make to this!