Going from Framer to Framer X
A designers guide to React

This is for anyone interested in learning how to do the “code” stuff within Framer X. If you’re just learning how to code, or previously could do anything in Framer Classic, then chances are you are getting stuck just like I was. Hopefully this gets you on the right track…
Look, React is hard
Going straight into React should feel challenging. There’s a lot of crazy syntax going on, but I promise in-between all those semicolons there’s something you’ll start to understand. I’m going to take you through some visual examples and break it down one step at a time.
Imperative vs. Declarative
React is the biggest change in Framer X, and learning it is more than just a new syntax from CoffeeScript. Turns out, there are different mindsets of programming, so trying to apply how you did things in Framer Classic simply won’t work.
Imperative - Stating what to do by giving specific instructions step by step on how to do it.
Imperatively giving directions…“Turn right in 100 feet, then turn left after 200 feet. Stop at the red light. Go when green. Go forward 2 miles and then take the exit.”
Declarative - Stating what to do, but not how to do it.
Declaratively giving directions…“Drive home.”
This shouldn’t make any sense right now, and that’s ok—that’s why you’re here. If you’ve read through any React examples, then you might have felt like code was missing or impossible to follow. There’s almost the feeling of magic happening behind the scenes, and that’s the declarative piece.
A Basic Example In Imperative and Declarative
Let’s say we wanted to make 8 Frames change their background color to blue after clicking a button.

The Imperative way
In Framer Classic, you’d break down each thing that should happen. After you click the button, then individually change each Frame’s background color to blue one by one.
“After I click on the button, change layer 1’s background color to blue, then layer 2’s background color to blue, then layer 3's…and so on”.
Button.onClick ->
   Frame1.backgroundColor = ‘blue’
   Frame2.backgroundColor = ‘blue’
   Frame3.backgroundColor = ‘blue’
   Frame4.backgroundColor = ‘blue’
   Frame5.backgroundColor = ‘blue’
   Frame6.backgroundColor = ‘blue’
   Frame7.backgroundColor = ‘blue’
   Frame8.backgroundColor = ‘blue’
The Declarative way
In Framer X, we need to start thinking declaratively. Thinking of what we want to happen, but not how to do it we might say,
“After I click on the button, change all the Frames background colors to blue”.
React is “Reactive”
Now’s a good time to cover the magic part of React. The declarative piece can also be described as “Reactive.” Simply put, variables behave a little differently. After a variables changes, it automatically updates whatever it was assigned to. This means that using a variable as the color would automatically update the Frame when its value changes.
Let’s go through what that would look like using familiar CoffeeScript (We’ll use the real syntax in the next examples)
bgColor = 'grey'Frame1.backgroundColor = bgColor
Frame2.backgroundColor = bgColor
Frame3.backgroundColor = bgColor
Frame4.backgroundColor = bgColor
Frame5.backgroundColor = bgColor
Frame6.backgroundColor = bgColor
Frame7.backgroundColor = bgColor
Frame8.backgroundColor = bgColorButton.onClick ->
   bgColor = 'blue'
Since we set each Frame’s backgroundColor to the bgColor variable, just changing the variable’s value after clicking the button will automatically change each Frame’s background color for us.
A Counter Example
Now that we’ve seen React can do some of the leg work for us, let’s build a counter using Framer X.
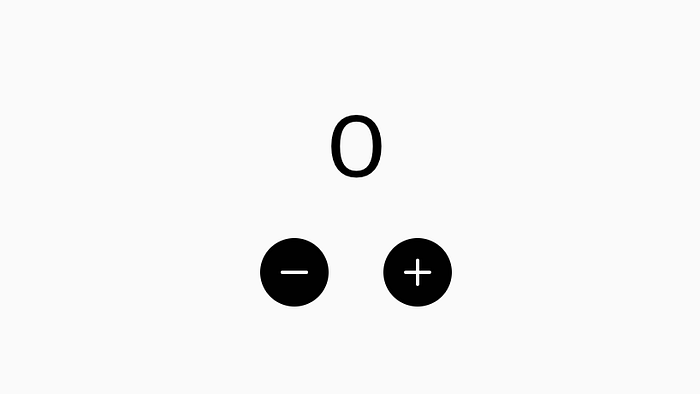
Let’s break this down and think of it declaratively. We know we have 1 thing changing in this, and that’s the count. We know when the plus button is tapped, it’ll add 1 to the count, and minus will subtract 1. We also know the only thing that will visually update is the big number up top.
From earlier, we know anytime a variable changes it also updates whatever it’s assigned to. So, if the big number’s text is set equal to the count variable, then changing the count variable should also update the text.
Overrides
In order to apply code to elements, Framer X uses an “override” concept. All this means is Framer is manually overriding the properties that you see on the canvas before displaying in the preview. There’s an overview here.
You can override the Height, Width, Opacity, Rotation, Radius, Background, Shadows, and more. Basically anything you can change in the right panel can be overriden.
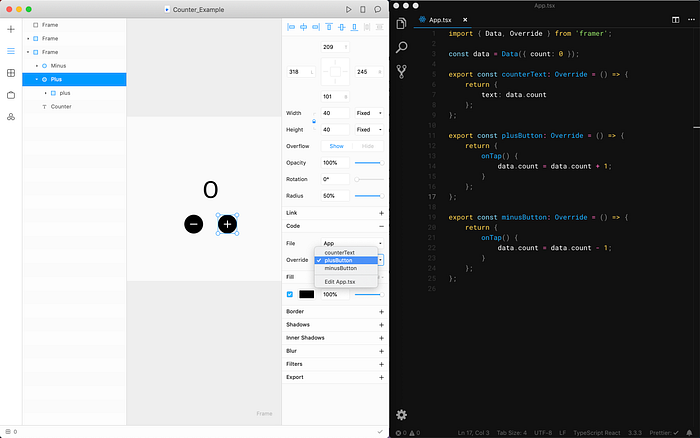
Let’s go through line by line…
import { Data, Override } from 'framer';Here, we are importing things from the Framer library. Other things we could import are Frames, Stack, Scroll, Page, etc.
const data = Data({ count: 0 });Next, we are going to use something that we just imported, Data. We’ll store all of our dynamic variables inside the brackets. You can see count is already in there with a value of 0, but we could add more variables by separating with commas. You can use these variables with the syntax data.variableName .
export const counterText: Override = () => {
  return {
    text: data.count
  };
};
For this next chunk, totally ignore everything for a moment and focus on the section text: data.count . This is overriding the text value and setting it equal to our variable data.count. Whatever data.count’s value is, the text will be equal. You’ll also notice I named the override counterText because this is only going to be used to update the big number up top.
export const plusButton: Override = () => {
  return {
    onTap() {
      data.count = data.count + 1;
    }
  };
};
This is going to look similar to the one above, and that’s because this is another override. There’s one difference, which is the onTap() event section. We can apply events to trigger things, and in this case we want to add +1 to data.count every time we tap it.
Just 1 more override for the minusButton and we’re set.
import { Data, Override } from 'framer';const data = Data({ count: 0 });export const counterText: Override = () => {
  return {
    text: data.count
  };
};export const plusButton: Override = () => {
  return {
    onTap() {
      data.count = data.count + 1;
    }
  };
};export const minusButton: Override = () => {
  return {
    onTap() {
      data.count = data.count - 1;
    }
  };
};

Here’s the file for the Counter Example
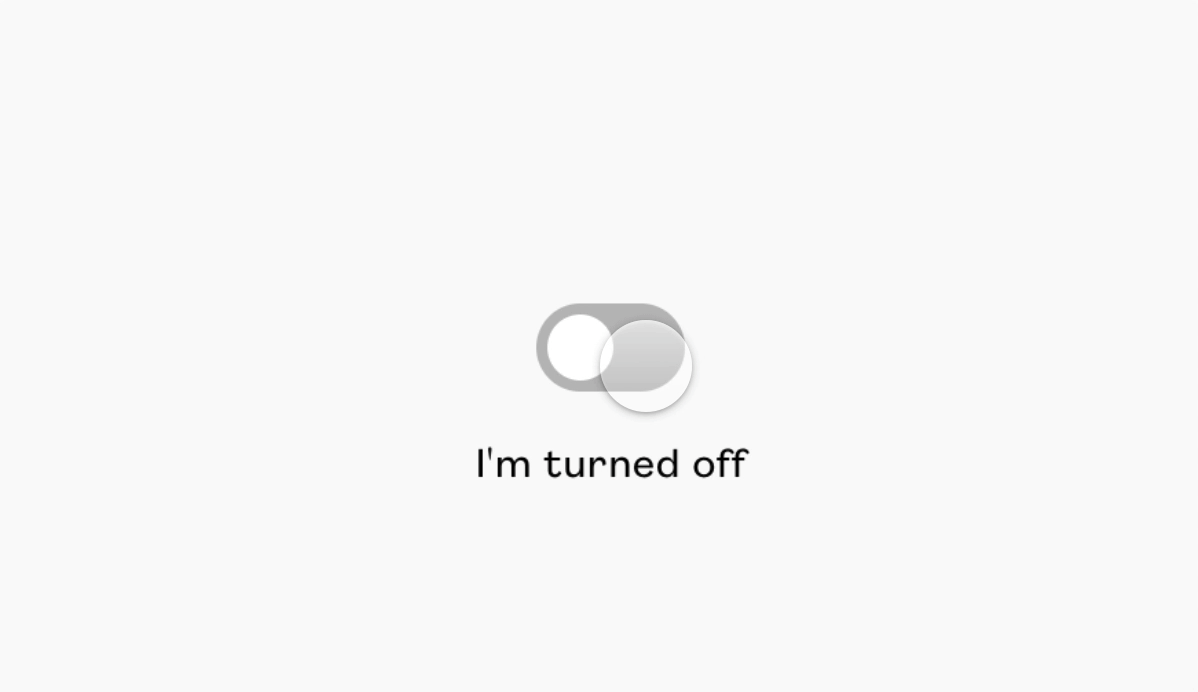
A Toggle Example
This next example is going to help you think through how to start setting up your prototypes with declarative in mind.
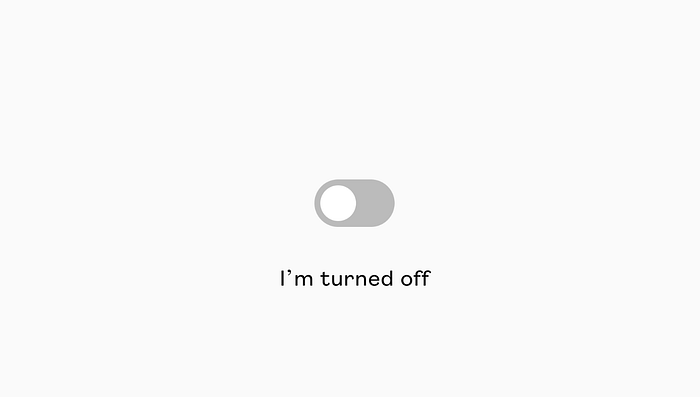
At first glance, we could create a variable for everything that changes such as the background, left position of the inner circle, and the text description. Sure that would work, but we could also just keep track of the state of the toggle. Let’s create a variable called isToggledOn and set it to go between true and false . After all, our declarative statement might be something like, “After I tap on the toggle, turn it on”.
Ternary Operators (If/else statements)
Something we can use to help keep our code clean and legible are ternary operators. Think of them as shorthand if/else statements.
text: data.isToggledOn === true ? "I'm turned on" : "I'm turned off"is the same thing as...if ( data.isToggledOn === true ) {
    text: "I'm turned on"
} else {
    text: "I'm turned off"
}
Now, let’s see how we can use the state of the toggle to get this thing to work
import { Data, Override } from 'framer';const data = Data({ isToggledOn: false });export const innerCircle: Override = () => {
  return {
    left: data.isToggledOn === true ? 26 : 4
  };
};export const toggle: Override = () => {
  return {
    background: data.isToggledOn === true ? 'blue' : 'lightgrey',
    onTap() {
      data.isToggledOn = !data.isToggledOn;
    }
  };
};export const togglesText: Override = () => {
  return {
    text: data.isToggledOn === true ? "I'm turned on" : "I'm turned off"
  };
};
Here’s the file for the Toggle Example
I hope this helped demystify getting started with React. Now you can take the red pill and go down the rabbit hole of what else React has to offer. Feel free to find me on Twitter and ask some questions 👋
Great resources to check out
- Framer tutorials page
- Join the Framer Slack group
- Join the Framer Facebook group
- Framer X tips & tricks
- A list with just about everything