How to design with real content in Figma
Content is king. Designers have known for quite some time now that it’s best to ditch Lorem ipsum and work with real content. Until recently though, it hasn’t been really easy to do. The main question is:
How do you get real content into the design tool?
I’m here to show you how. There are actually several ways of doing this and we will look at a specific one but you are free to explore (and I am going to hint at other ways at the end of this tutorial).
In this tutorial, we will:
- model and create content
- design a simple product page
- connect real content to elements in our design file
This is pretty exciting and I can’t wait to show you. Before we dive in, let’s briefly look at a mindset that this tutorial is coming from.
Content-first design
For years, the prevalent mindset in design practice has been “form first, content second”. Designers would come up with layouts and then fit (or rather cram) real content in the existing layout. This is problematic for several reasons.
It’s easy to run into a big mismatch between the design and the content. More importantly, though, it makes content second priority even though that’s what users and customers come to the business for.
This mindset has started to shift towards a content-first design in recent years. It’s the approach of thinking through the content first, modelling it, creating it and only then designing around it.
I encourage you to read more about it: https://responsivedesign.is/design/content-first-design/
Now that we're on the same page, grab yourself a cup of your favourite hot beverage and let’s start.
What you'll need in this tutorial
To make this happen, we’re gonna need a couple of things:
- Source of content (I chose Kentico Kontent, the content-as-a-service platform I’m working on)
- Design tool (Figma, because it's cool)
- Plugin to fetch the content and put it into the design file
For the last bit, the “API / JSON Sync” plugin by Emin Sinani is a perfect choice. I know that API and JSON may sound scary but don’t worry, we won’t be writing any code. We will only fiddle with some URLs.
Here's a visual overview of how it will work:

First, we will define, model and create the content we need. We’ll then go and design a simple product page for a coffee e-shop using that content. Finally, we'll populate the design with the content we prepared using the API/JSON sync plugin.
I encourage you to create everything with me as you’ll go along to try it for yourself.
Step 1: Modelling content
First, we have to think about the content we’re going to need and model it. For the purpose of this tutorial, I’m going to keep very simple. Let's say we're selling Aeropress Go on our e-shop (because Aeropress is awesome). The most basic content we'll need is:
- Name
- Short description
- Image
- Price
Next, we’re going to need a source for this content and a place to model it. I’m gonna use Kentico Kontent but feel free to substitute it with a headless CMS of your choice.
You can create a free account in Kontent and a new project for this (I named mine “Coffee Magazine”).
We’ll go to the Content types section and create a new type (let’s call it “Product”) which we’ll use to create our product later. Knowing what content we’ll be working with, we’ll add corresponding content elements:
- Text element for the name
- Image element for the product image
- Rich text element for the description
- Number element for the price
We’re keeping it simple so that’s all we need for now.
One thing that’s going to be important for us later is the codename of each element. We’ll use it to tell which element is which when we fetch the data via the plugin in Figma. Go to each element and note down its codename.
Good job! We just modelled how our content will look like and now we can continue with creating some.
Step 2: Creating content
With the right content type ready, we can create a new item to start working on our product’s content.
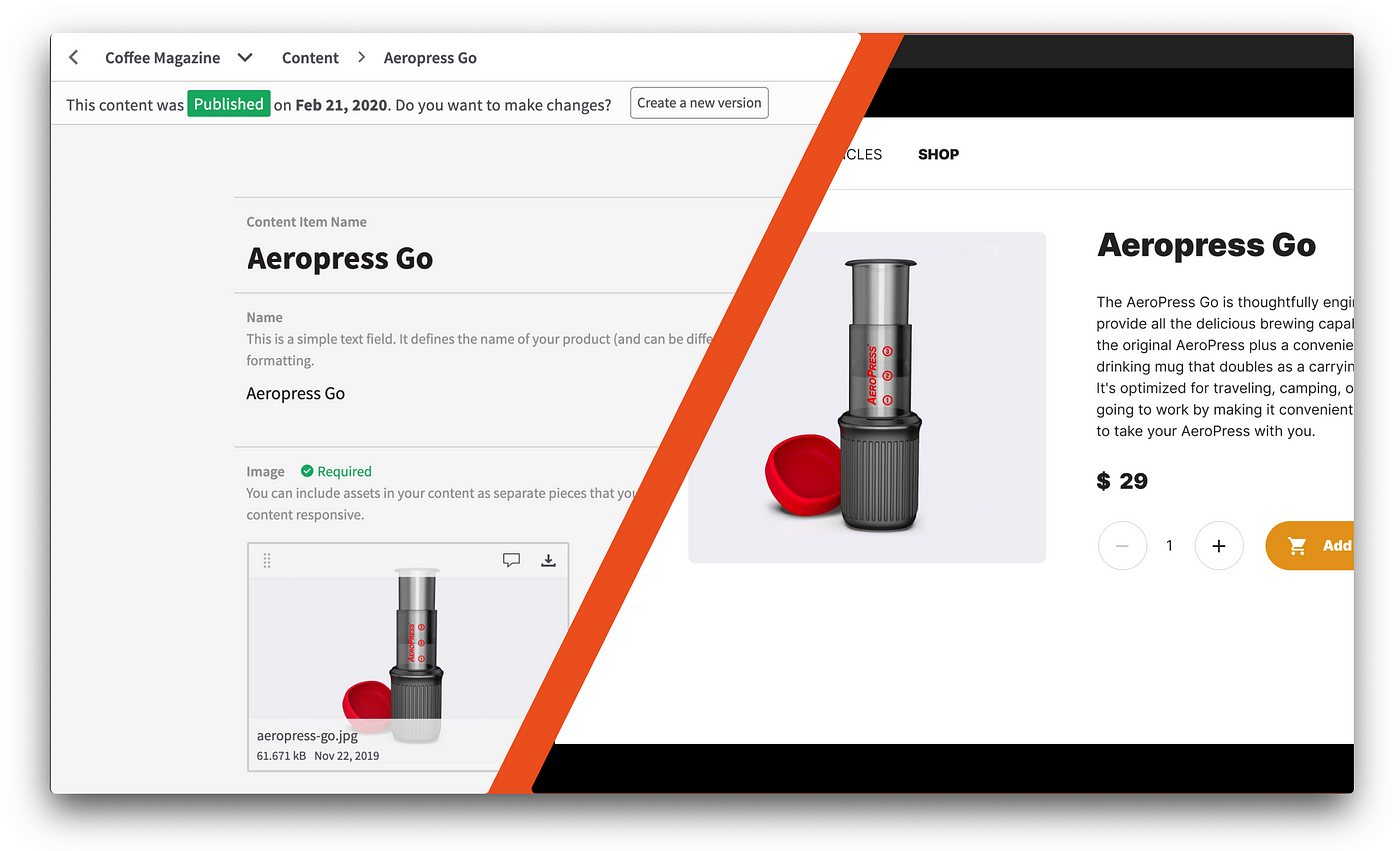
We’re gonna write the name, upload the product image, and write a short description. Finally, we’ll give it a price of $34 so that's what we'll put in the number element.
The next step is to publish the content item because the API will only give us content from published items.
Nice, the content is ready. We can now jump to the fun part and start designing our product page.
Step 3: Designing the product page
Because the content we’ll need is already prepared, it gives us a pretty good idea about what’s gonna be on the page and we can design for it accordingly. This is the big benefit of the content-first approach.
Let’s jump into Figma and design our layout. I won’t go into detail here so that you can get creative and design it however you want (and to keep the tutorial reasonably long).
I created a very simple layout for the page that contains all the elements we’re going to need. Most importantly, the name, description, price and image elements.
Because the content can change in the future, it’s good practice to use auto-layout so that for example longer description or longer name won’t break our design.
This is what our page looks like now:
You can get the Figma design file containing the template as well as the finished design.
Step 4: Populating the design with real content
We are finally getting to the meat of this tutorial. We’re now ready to do the final step and populate our design with content we previously created.
If you haven’t already, go ahead and install the API/JSON Sync plugin.
When you open it up, you’ll see that you can insert a URL or a JSON. We’re gonna be working with an API URL.
Let’s open up Kentico Kontent’s Delivery API documentation. We need to find out how we can retrieve elements from a specific item. The API can provide us with a specific URL which, when visited, will return a JSON file:
This is exactly the URL we need to feed the plugin in Figma:
https://deliver.kontent.ai/{project_id}/items/{item_codename}
Now we’ll go back to Kentico Kontent to get the Project ID and the item codename.
You can easily copy the project ID from the URL in your browser:
And you will find the item codename inside your content item:
Let’s go back to Figma and open the API/JSON Sync plugin. We’ll paste there the API URL with our project ID and the item codename.
If you want, you can reuse mine:
https://deliver.kontent.ai/701baeb4-9a87-0063-4754-2d1604e47679/items/aeropress_go
You can visit this URL in your browser to see the JSON file it provides you. When you load the URL in the plugin, you will see the content of the JSON file in a structured way.
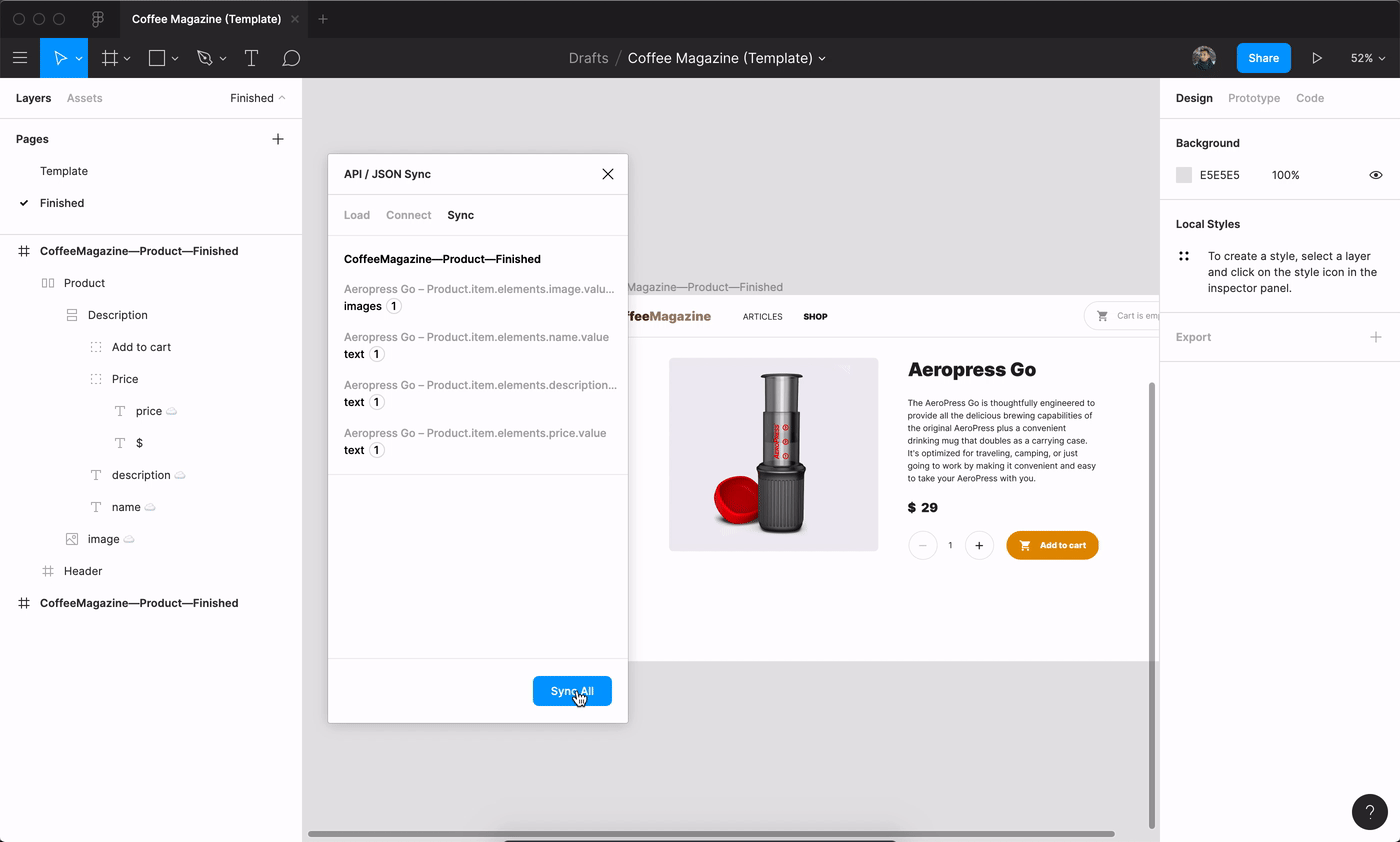
We’re now ready to connect the content we got via API with elements in our design file.
We can start with the name and the image. In the plugin, find the name's value, select it and also select the layer in Figma you want to connect it with. Do the same for the image, only now you’ll need the image URL.
Voilá, the name and the image are now loaded from our content source!
We can repeat this process for all the remaining elements. It’s a little more complicated with the description.
If you remember, we modelled the description as a rich text element. That means it can contain various formatting and so the API will give us the value of this element as HTML. We have to remove the enclosing <p> tags manually and if we formatted the description in our CMS, we’d need to re-do the formatting here. That’s not ideal, but still way better than the old ways of copy-pasting!
For the price element, you’ll notice we split it into two text layers in Figma so that we can easily fill one of them with a simple number from our content source.
Great job! We now successfully filled our design with real content. It's looking pretty good now.
Bonus: Changes and updates? No more copy-pasting!
Of course, in the real world, things change and content gets updated. Let’s say our copywriters thought the description was too long and updated it. They also changed the name which is now longer and the price was increased. This is what it now looks in the content source:
In the old days, we’d have to go and copy-paste the updated content into our design to see if it needed any changes. That’s tedious and nobody wants to do it. The good news is, you don’t have to anymore.
When the source content item was now updated, we can go and update the content in our design in just a few clicks — simply use the “Sync all” button in the plugin and the content will be updated in our design file.
Sure, we still have to manually fix the rich text description but it’s now way less work than it used to be. This also nicely shows how the content changed in length and that's why using auto-layout should be a best practice.
Below is our final result. It took us seconds to update our design with real content!
Other options of working with real content
This is just one way of working with real content. If you're not a Figma user, you can use the Data Populator plugin for Sketch and Adobe XD.
For the content source, you can choose a different headless CMS. Or you can use Google Sheets and sync your content with this cool plugin.
Here are more tips for other Figma plugins than enable you to work with real content: https://www.figma.com/blog/plugins-to-help-you-design-with-real-content/
Content first, form second
We covered a lot of stuff in this tutorial. From defining and modelling content in a headless CMS to working with it in Figma and even updating it after some changes. Hopefully, it was valuable and interesting for you.
I also hope I showed you how important but also easy is working with content first and designing the form second. Thanks to the advancement in design tools and headless CMS technology, it’s now possible for teams to shift the mindset to content-first design.
Designers and copywriters have the means of working more efficiently together and content finally gets the treatment it deserves.
Resources
- Figma
- API/JSON Sync plugin for Figma
- Kentico Kontent
- Kontent Delivery API Reference
- Data Populator plugin for Sketch and Adobe XD
- Google Sheets Sync plugin for Figma
- Plugins to help you design with real content in Figma