
How to run a remote usability test
A 5-step process to collect early feedback from your users
Putting yourself in someone else's shoes is probably one of the most important skills designers should learn, and practice, throughout their entire career. After all, we design solutions for others, not for ourselves, right? At least in theory.
Now think about how many times you felt tempted to make a biased design decision, based on how you would use the product or how you think the user would use it? Let's be honest, we are all guilty on that one.
So a question comes to mind: how will we know if our solutions make sense in the real world if we don't expose them to the very people who will benefit (or not) from them?
We must invite users participate in early stages of product development, not just after launching it.
There are plenty of quantitative and qualitative methods for obtaining user feedback. The choice will depend on what you would like to achieve. In this post, we will explore a method for validating user flows during agile development cycles: remote usability testing.
How it works
Usability testing is an efficient way to measure users’ ability to complete tasks in order to reach their goals. For instance, "having a great holiday experience in the mountains" can be considered a user goal. In order to achieve it, users may need to rent a car, book accommodation, buy gear for camping, and so on. These can be considered user tasks.
According to Nielsen, the task success rate is the simplest usability metric to be considered.
"After all, if users can’t accomplish their target task, all else is irrelevant" — Jacob Nielsen
If everything goes according to plan, by the end of a sprint we will have a few functional features ready for testing. So it is time to measure users' task success rate to discover if a feature is ready to be deployed and made available to all users.
In order to run a successful remote usability test, we follow a 5-step process:
1. Define your goals and target group
As mentioned before, the first step is to define which tasks you intend to test, which target group, and scenarios you would like to consider. Once you have it all defined, it is time to recruit some testers.
2. Recruit testers
Look for volunteers who fit in the desired profile. Since tests will be carried out remotely, you can recruit people from just about anywhere. Social media channels such as Facebook, Twitter, and LinkedIn are good options for contacting people who may be interested in testing out our product/prototype. As an incentive, you can offer gift cards for those willing to participate.
How many people do we need?
For qualitative tests, Jakob Nielsen recommends that 5 people are enough to raise crucial usability issues. Naturally, the number may vary according to product complexity, but considering the cost-benefit ratio, 5 to 8 people are likely to provide you with the feedback you need. It is also advisable to schedule with at least 3 extra volunteers, in case someone is not able to show up on the test day. Ideally, all sessions should be scheduled for the last day of the sprint, when all prioritized features are fully working and ready to be tested.
Setup
Depending on the platform in which the product will be tested, you will need a minimal setup. For desktops, use a teleconference tool that offers screen sharing and recording. You can also use a combination of tools to achieve the same result. For smartphones, we recommend tools that are integrated with the app or prototype, such as lookback.
3. Write a test script
A test script will help you to structure and facilitate the session. It can be divided into 3 parts:
- Contextual Questions;
- Scenarios and tasks;
- Questions about the experience.
Contextual questions
They help as “ice breakers” and aim to make testers feel more relaxed and comfortable with the remote environment. It also works as a tool to gather information about the testers, their contexts, and needs. Think of questions like:
- How do you get to work?
- How long does it take?
- How reasonable do you consider this time?
Scenarios and tasks
Since testers have not deliberately chosen to use our product, it will be necessary to simulate a real use case. So we present them with a hypothetical scenario in which they will perform a particular task. For example:
- Scenario: You are on your way to work and your friend texts you asking if you bought the tickets for tonight's game. You realize you've totally forgotten about it and want to buy them immediately. Task: Grab your mobile phone, access our app, and buy 2 tickets for tonight's game.
- Scenario: You are at home, watching a nice movie that just came out. You feel hungry and decide it would be nice to have pizza for dinner. Task: Grab your mobile phone, access our app, and order a medium-sized pepperoni pizza.
Questions about the experience
Finally, it is time to collect the tester's impressions about the proposed solution. You can ask questions like:
- How was the experience like?
- What did you like and what did you dislike about it?
- Would you recommend it to a friend or family?
- How would you describe the product to a friend or family?
- Which words would you use to define the product?
Whenever possible, run a pilot test to validate the script and make necessary adjustments to it.
4. Run the test session
After all the planning, it is finally time to run the test. In order to keep the tester comfortable, we recommend a maximum of 2 people participating in the call. One of them will facilitate the session while the second one will observe and take notes.
Following your test script, you will start by asking some contextual questions. Bear in mind that the tone of this first exchange will set the mood for the entire session. Try to create an informal and pleasant atmosphere so users can feel comfortable and as close as possible to a real use case.
Pay close attention to the answers. They can trigger more questions about a particular subject worth exploring. You can take advantage of this moment to discover unmapped needs.
Before moving forward with the usability test, it is important to orient testers with a few recommendations:
- Make it clear that the goal is to test a product, not the user;
- Ask testers to describe what are they thinking about while executing the task at hand. Try to capture their emotional state throughout the process.
- Encourage testers to be as blunt and critical as possible so you can get honest and valuable feedback. Assure them that they will not hurt your feelings by doing so.
Try to avoid any interference while the tester is performing a task, except when they get stuck and ask for help. If they ask you “what should I do?” or “where should I click?”, you can reply with a question: “what do you think you should do?” or “where do you think you should click?”
During the test, an observer will be recording two main metrics: task success rate and time needed to execute each task. If users are able to complete the task, you can mark it as success and score 1 point for it. If they get stuck and are not able to complete the task, you can mark it as fail and score 0 points for it. You may want to include a third option for those who almost got to complete the task, marking them as partial success and scoring a range from 0.1 to 0.9, depending on how much of the task they were able to complete.
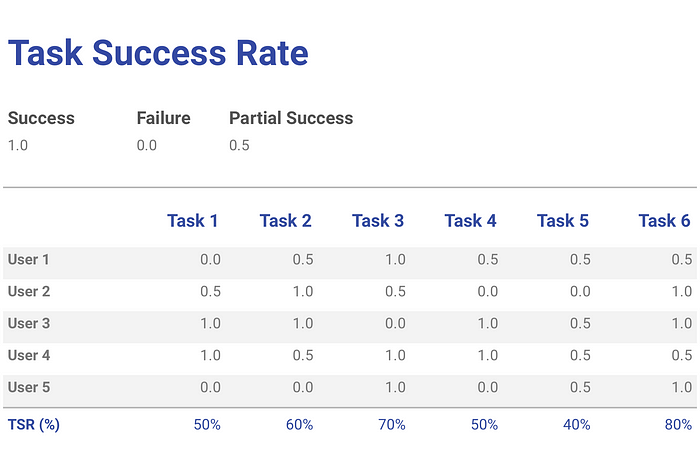
By the end of the session, you can sum all scores from each task and divide them by the number of testers to obtain an overall task success rate. This number coupled with time to will give you a general picture of how usable your solution is and how much work is needed to make it really work.
The same goes for the time to complete a task metric. It works as a benchmark for further improvements on your solution. The quicker a user is able to complete a task, the better.
Once the tester is finished with the proposed tasks, it is time to carry on with questions about their experience.
5. Summarize what you have learned
If everything goes well, it will have been a very intense and enlightening day. Now it's time to consolidate, analyze and extract insights for the following development sprints. How you will present results is up to you. As long as you clearly communicate your learnings, you can choose a spreadsheet, a slide presentation, a video recording, or any other format you consider adequate to your context.
Conclusion
The pace of change is increasing and shows no signs of slowing down. So it makes sense to take an experimental approach to learn fast and apply those learnings to evolve your product, instead of spending too much time and energy planning something that may be obsolete by the time it is launched.
User testing helps to reduce uncertainty, saves resources, and increases the likelihood that the software will positively impact the user. While embracing user testing, we invite people to co-author the solution. It is a unique opportunity to understand their pains, anxieties, and points of view. In other words, it will help us to put ourselves in our user's shoes.

