USER RESEARCH
Moderating UX research with Zoom

More years ago than I care to admit, UX research (it wasn’t called that then) tended to take place in usability testing labs with heaps of expensive audiovisual equipment and sound desks. UX labs still exist today, but many years ago they resembled a cross between a police interrogation room and a music studio. Now they just look like interrogation rooms, but with soft furnishing.
These days you don’t need labs, most of what you need is available in Zoom, the video-conferencing software which can be used free-of -charge.
In this post I’m going to talk you through the various setups I use with Zoom to run and record my in-person and remote user research sessions on both desktop and mobile.
I’m going to assume you understand the protocols for running a user research session responsibly, so I can keep this as concise as possible. But it’s not concise, it’s quite long. Sorry.
First Install Zoom
Go to www.zoom.us and download the desktop client. Then set up an account.
I’ll walk through the setup for a variety of session types. I realise you might want to skip straight to the setup you’re interested in, but read number 1 first. This is the basis for all the setups which follow.
I recommend you run through these setups with a colleague/friend to familiarise yourself with how it works before trying it for real.
1. An in-person desktop session with screen capture
In this scenario it’s you and the participant in a room together. You just want to record the conversation and your own desktop screen (we’ll cover mobile devices and observation later).
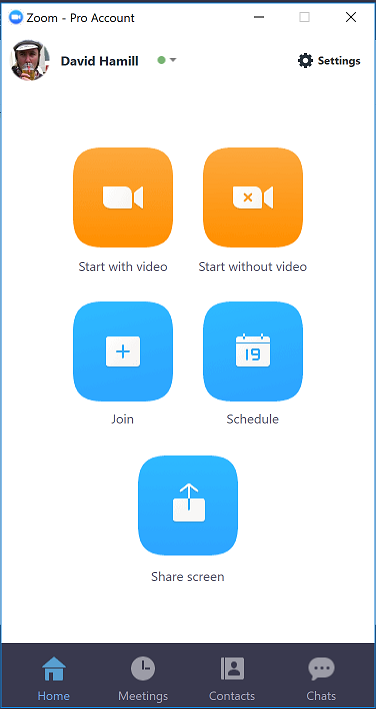
At the end of the session, Zoom will email you a link to the recording for you to download. It will include the audio and screen capture from the desktop you’re using in the session.
- To start the session recording, open the Zoom client
- Choose Start with video to begin a meeting
- When the Zoom meeting has started, test the audio. When you speak you should see the microphone icon pulse green. You can run a playback test in the audio options by clicking the wee arrow beside the microphone icon at the bottom.
- Choose the green box at the bottom labelled Share and then Screen from the options. You’re now sharing your desktop screen to the meeting. If you want you can restrict this purely to the browser you want to use by selecting this instead of screen.
- Now choose Record which is a few options along from Share (it’s sometimes hidden in an overflow menu somewhere). The meeting is now being recorded. Note — you need to be the host of the meeting to record. You can pause the recording at any time and get it going again during the meeting without losing your progress.
- When you have finished your session with the participant, simply end the meeting and the recording will stop. You will be emailed a download link, usually within an hour.
The free account will allow you a 45 minute session.
Adding observation
When you want others to observe this session live, there are a few precautions you should take. I recommend you define a designated observation room and ask everyone to go to that room and join the call from there. This way, there is only one meeting room visibly in the call rather than a dozen individuals.
- Set the meeting up so participants join muted with no video. You can do this by scheduling the meeting (Schedule on the main menu) rather than simply starting it. These options are in the advanced meeting options on the scheduling screen. Don’t worry about the time you choose for the schedule, you can start it whenever you want.
- Start the call before the participant is in the room. You can do this by going into Meetings in the main menu of Zoom and choosing Start from the appropriate meeting you’ve scheduled.
- Then start the recording after the participant has given informed consent.
- Mute the volume on the test machine so no sounds from other attendees will be heard on the machine you’re testing with.
2. Remote desktop research session
In this setup, you are moderating a session where your participant is not in the same physical location as the you. You’re using Zoom for both the video-conference and the session recording. You’re both on desktop machines in the call and you want to observe and capture their desktop screen in the recording.
The link to the video call
In order to join the session your participant will need a link to the video call. You can either schedule an individual Zoom meeting for each session or have one call to cover all of the sessions. If you do the latter, just make sure you’ve allowed a good 30 minutes in-between sessions. This will prevent one participant joining early while you’re running late with the previous one.
It’s worth testing the Zoom setup with them in some way before the day of the actual session. There are rare issues with participants not being able to join calls. Zoom is the best video-conferencing I’ve used in terms of the level of reliability and alternate options if things go wrong.
Necessary hardware
In your recruitment screening, make sure the participant has a microphone and camera (optional) for their desktop macine. It’s easy to assume everyone does these days, but many don’t.
Test their setup before the call
If you have the time, it’s a good idea to get the participant to test their equipment and setup to make sure the call will work. You can do this by sending them to www.zoom.us/test and running through the instructions. If you do this, ask them to confirm everything went OK.
Alternatively you can do a pre call before the day of the session, to test everything out. If you are employing a recruiter to find your participants then this is a run-through you can delegate to them.
On the call
The process during the session is much the same as when you have them in the room with you, except you’ll need to talk them through sharing the screen and handle informed consent remotely.
Remote consent
A simple way of doing remote consent is to share your screen with the consent form on it and have them read through it. When they are ready you can begin recording, have them state their name and acknowledge they are happy to give consent to what’s written on the form. Alternatively, do what financial services companies do with their contact centres and read it all out. Then ask the participant if they are happy to proceed with the session being recorded.
Observation
I’m not comfortable having a bunch of people on the call when it’s remote. At most. I’ll add a meeting room where people can go to observe, just like an in-person session and explain to the participant what’s going on.
3. In-person mobile session
In this setup you are with the participant but instead of testing on a desktop machine, you are testing on a mobile device.
You can have loads of people on the call without worrying about spooking your participant because they are looking at their phone and not your computer (of course, tell them people might join to watch). I’ve had observers from Edinburgh, London, Budapest, Barcelona and Singapore all watching the session online at the same time.
Just remember to mute the volume on your laptop. People have a tendency to accidentally unmute themselves at times.
Use a camera
When you have the person with you, I advise opting for a camera to capture the mobile screen rather than relying on any mobile screensharing. The lower screen clarity is usually more than offset by the ability to see the participant’s hands.
I use an IPEVO 2 document camera which is no longer available, but its replacement looks pretty good. I might get myself one of those soon. Some people prefer a rig/sled to allow the user to hold the device more naturally. I get this argument, but so far still prefer a document camera.
IPEVO Visualiser
Whichever camera setup you use, you can download IPEVO Visualiser software for free and use this to show the picture from the camera (pointing at the participant’s device) on to your laptop screen. You can then record this by sharing your laptop screen to the meeting and choose Record.
Visualiser allows you to zoom in a bit, lock focus (auto-focus gets distracted by hands in front of the camera) and rotate, so your laptop screen is full of phone screen for the recording and observers. And it’s also the right way round for them to watch.
You can now look at your laptop rather than encroach on your participant to see their phone. Just don’t place your laptop so you’re facing away from them, otherwise you won’t be watching your participant at all . You’ll appear dissinterested in them and may miss important gestures and body signals.
If you have a second external web cam
Point your external webcam at the participant and change to this camera in the Video options by clicking the little arrow beside the video camera icon at the bottom of the screen during the Zoom meeting. You’ll now have picture-in-picture in your recording and for observers.
If you don’t have a document camera or rig
If you have no camera to capture the mobile screen then opt for the same set up as described in the (next) set up for remote mobile sessions. It’s just you don’t need them to join the call in this one.
Just remember that only you and the participant can see where they are pointing. For the sake of the recording and observers, work this into your moderation by asking them to be very clear which things they are talking about.
4. Remote mobile sessions
This is where it gets a bit trickier. Until recently iOS was very complicated in terms of screensharing. But since iOS 11, things have gotten easier. If you’re recruiting iOS users, you need to make sure they have iOS 11 or higher, otherwise you won’t be able to get them to share their screen. For Android phones, you don’t need to worry, it’s very simple.
I’ll explain it first for Android users and then explain the differences for iOS. So read the Android bit regardless of what device your participants are on.
Pre-warn participants
Make sure your participants are told before the session that they will be asked to share their phone screen and that screen will be recorded. This isn’t something you want to spring on them at the time of the session.
Extra think aloudy
I ask participants to talk to me more in a remote session than in-person, generally because I can’t see as clearly what they are looking at. So I’ll pester them a bit more to tell me.
Android sessions
To set up a session on Android, simply organise yourself as if it were a desktop research session, except get the participant to have their Android phone with them at the time of the session and make sure it’s connected to Wifi or has a 4G signal.
Also, find the meeting ID before the session. It’s the string of numbers at the end of the meeting URL.
Either during or before the session, have the participant download the Zoom Android app. When you’re on the call with them on desktop ask them to…
- Open the Zoom app
- Select Join Meeting. They don’t need to sign in to the app or create an account.
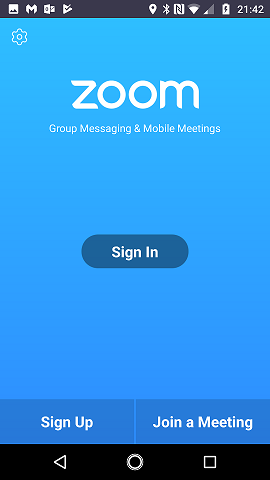
- Now give them the meeting ID to type in to the next screen. But before they tap the blue Join Meeting button, there are 2 toggles lower down the screen you want to make sure are turned on. These are Don’t Connect to Audio and Turn off my Video. Their phone number pad might be obscuring them at first.
- When the participant has done this, ask them to tap the blue Join Meeting button.

- They will then appear in the call. Ask them to choose the Share option at the bottom of the screen in the middle.


- They will see a list of options. Ask them to choose Screen
You should now be able to see their screen on the call and you are good to go. You can send them links to prototypes in the chat window. Note that the bottom right of the screen will be slightly obscured by the sharing control. They can move it around if it gets in the way.

iOS
iOS has stricter security settings than Android so you need to walk participants through a process of changing their setttings in order to do screenshare. Send them instructions to do this before the session
- Open Settings.
- Tap on Control Centre.
- Tap on Customise Controls
- In the More Controls list, tap on Screen Recording.
Screen recording should now appear in the list of customised controls. This will allow them to give broadcasting permissions to specific apps.
At the time of the call when you want them to screenshare, ask them to join the call from Zoom app (see Android instructions). Unlike with Androind, ignore the screenshare option in the Zoom app and ask them to open up their Control Centre by swiping from the top-right of the screen (for iOS12, it’s from the bottom on iOS11).
They now need to do a firm press (not a tap) on the circular icon at the bottom of this screen.
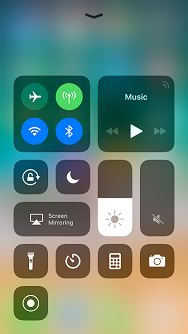
This will bring up the screen below. With Zoom selected (there should be a tick beside it) they should choose Start Broadcast.

Their screen should now appear in the call.
Older iOS devices
You can still do screenshare with iphones running iOS10 or earlier but your participant needs to be joining the call from a Mac.
They also need to be able to connect their iPhone to their Mac with a USB cable. If they have a newer Mac, that’s not so straight forward because of Apple’s courageous decisions to get you to buy more hardware. They also need Quicktime Player to be installed on their Mac which should be there by default.
The setup goes like this
- Ask the participant to enable Do not disturb on their iOS device
- Now ask them to plug their iPhone into their Mac with a cable
- With the iOS device connected to their Mac ask them to hide all other windows.
- Ask them to share the screen of their Mac.
- In Quicktime, ask them to start a new movie recording.
Their device screen should appear on their Mac and you should be able to see it through the screen share. You can now run the session as you would the others in this post.

Opportunity for technical failure?
Frankly, I try to keep technical jiggerypokery to a minimum in research sessions, especially remote ones. This is because every new technical dependency you add, multiplies the chances of something going wrong and killing the session.
If I need to test with older iOS devices in this way I will ask myself whether in-person studies or unmoderated studies are actually a better option. I have normally concluded that one of these alternative would be better.
If you’re going to do this setup then get the participant to get it working themselves before the session to make sure it all works.
The laptop hug
Some people use an approach called the ‘laptop hug’ for capturing remote mobile research. I’ve only ever watched other people’s sessions and found it a rather pointless exercise due to the inability to understand what on Earth is happening on the participant’s device.
I’m not even going to explain it here. If you are interested, Google it.
Remote observation of recordings
In some of these setups, live observation isn’t adviseable. The way I often get around this is to schedule observation sessions with the ability to join remotely on Zoom. I then share my screen and play the recordings.
There are 2 checkboxes for Share computer sound and another for Optimize for full screen video clip which will appear at the bottom of the modal window for screen sharing. If you select these then your observers can watch it as though it were live. I’ve sometimes had to remind observers they were watching a video rather than a live session because they didn’t notice the difference.
What setup are you using?
The techniques people have been using to improve research sessions have been constantly getting better. I bet you know some stuff I’d love to hear about. If so, share it in the comments below.
Note — I’ve updated the instructions for iOS devices based on information provided in the comments from Zsolt Kocsmarszky of PingPong. Thanks Zsolt.


