Neumorphism in Adobe XD
 The year 2020 has ushered in the growth of technology that influences design trends. As designers, we need to constantly keep learning, improving, and expanding our design toolkit to be up to date on the current market. One of the biggest trends of the year is Neumorphism.
Neumorphism which is basically, “New skeuomorphism” represents a very detailed and precise design style. Its Highlight, shadows, glows and attention to detail is very impressive and definitely on spot. While Skeuomorphism is the design of elements that are created in a realistic or way to match real-life objects, Neumorphism gives a much more modern fashion.

How to carry out Neumorphism
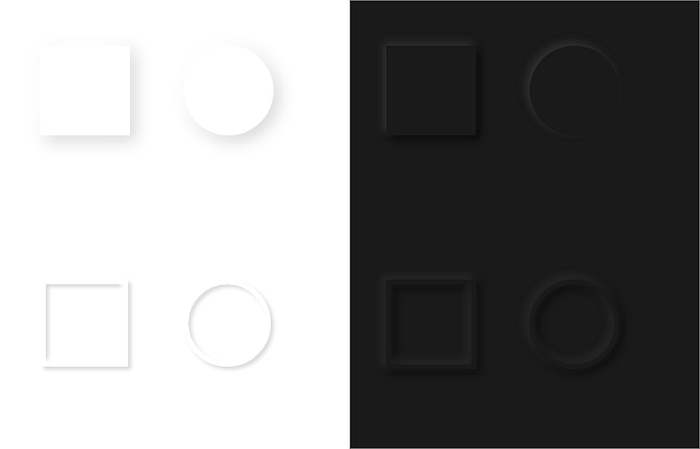
For this article, we would be outlining the steps involved in carrying out Neumorphism on Adobe XD in light and dark mode instances using three steps. They could appear as outer or inner soft UI objects.
We would need to select the right color palettes this is done by picking 3 shades of the same color.
- Light Color for Light Shadow
- Mid color for Main background and Element color
- Dark Color for Dark Shadow

1. Creating Outer Neumorphism in Light Mode
Create a rectangle, with white color (#ffffff) or the same as the background. Ensure the borders are switched off.
Add shadow of value X: 6, Y: 6, B: 18. Shadow color should be set to Black (#000000), set the opacity to 16%

Alt + Drag or Simply duplicate by using Ctrl + d or Cmd + d. input negative values for the copy of the shadow, X: -6, Y: -6, B: 18. Shadow color is then set to white (#ffffff) with an increase in opacity to 100%.

Place the duplicate on the original copy or select both copies and align horizontally and vertically.

To convert to a circle: Select both copies right click and select “Make a component”, make a duplicate of this component and change the value of radius to 100 to make a circle.

2. Creating Outer Neumorphism in Dark Mode
Create a rectangle, with a dark color (#1A1A1A) or the same as the background. Ensure the borders are switched off.
Add shadow of value X: 4, Y: 4, B: 10. Shadow color should be set to Black (#000000), set the opacity to 70%

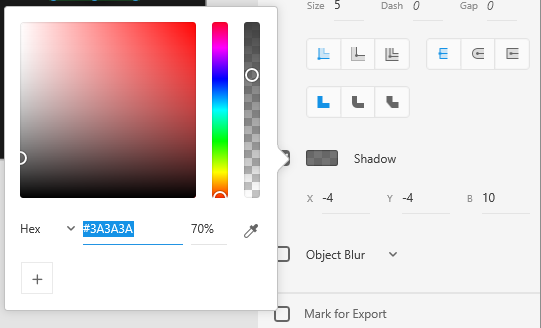
Simply make a duplicate, input negative values for the copy of the shadow, X: -4, Y: -4, B: 10. Shadow color is then set dark (#3A3A3A) with opacity set to 70%.

Place the duplicate on the original copy or select both copies and align horizontally and vertically.

3. Creating Inner Neumorphism in Light Mode
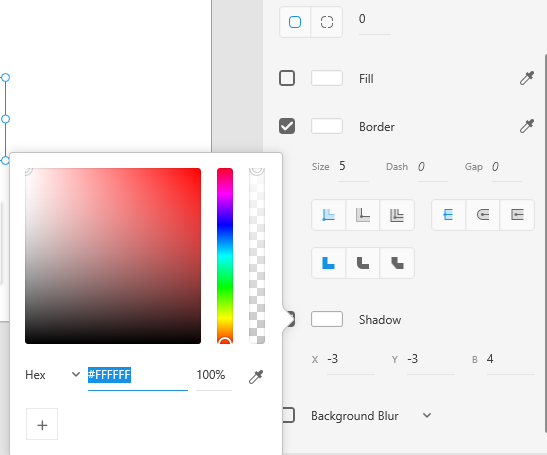
Create a rectangle, with a border of size 5 and white color (#ffffff) or the same as the background. Ensure the fill is switched off.
Add shadow of value X: 3, Y: 3, B: 4. Shadow color should be set to Black (#000000), set the opacity to 16%

Create a duplicate, input negative values for the copy of the shadow, X: -3, Y: -3, B: 4. Shadow color is then set to white (#ffffff) with an increase in opacity to 100%.
Place the duplicate on the original copy or select both copies and align horizontally and vertically.
Tip: To convert from Inner to Outer, turn on fill.
4. Creating Inner Neumorphism in Dark Mode
Create a rectangle, with a border of size 5 and dark color or same as background (#1A1A1A). Ensure the fill is switched off.
Add shadow of value X: 4, Y: 4, B: 10. Shadow color should be set to Black (#000000), set the opacity to 70%
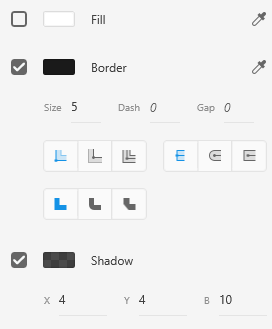
Create a duplicate, input negative values for the copy of the shadow, X: -4, Y: -4, B: 10. Shadow color is then set to white (#3A3A3A) with an increase in opacity to 70%.
Place the duplicate on the original copy or select both copies and align horizontally and vertically.
As a designer staying update to date with the latest design tools and trends would help in the long run. If you have any questions regarding Neumorphism or other trends in general, reach out to Dribbble, Twitter, Linkedin.