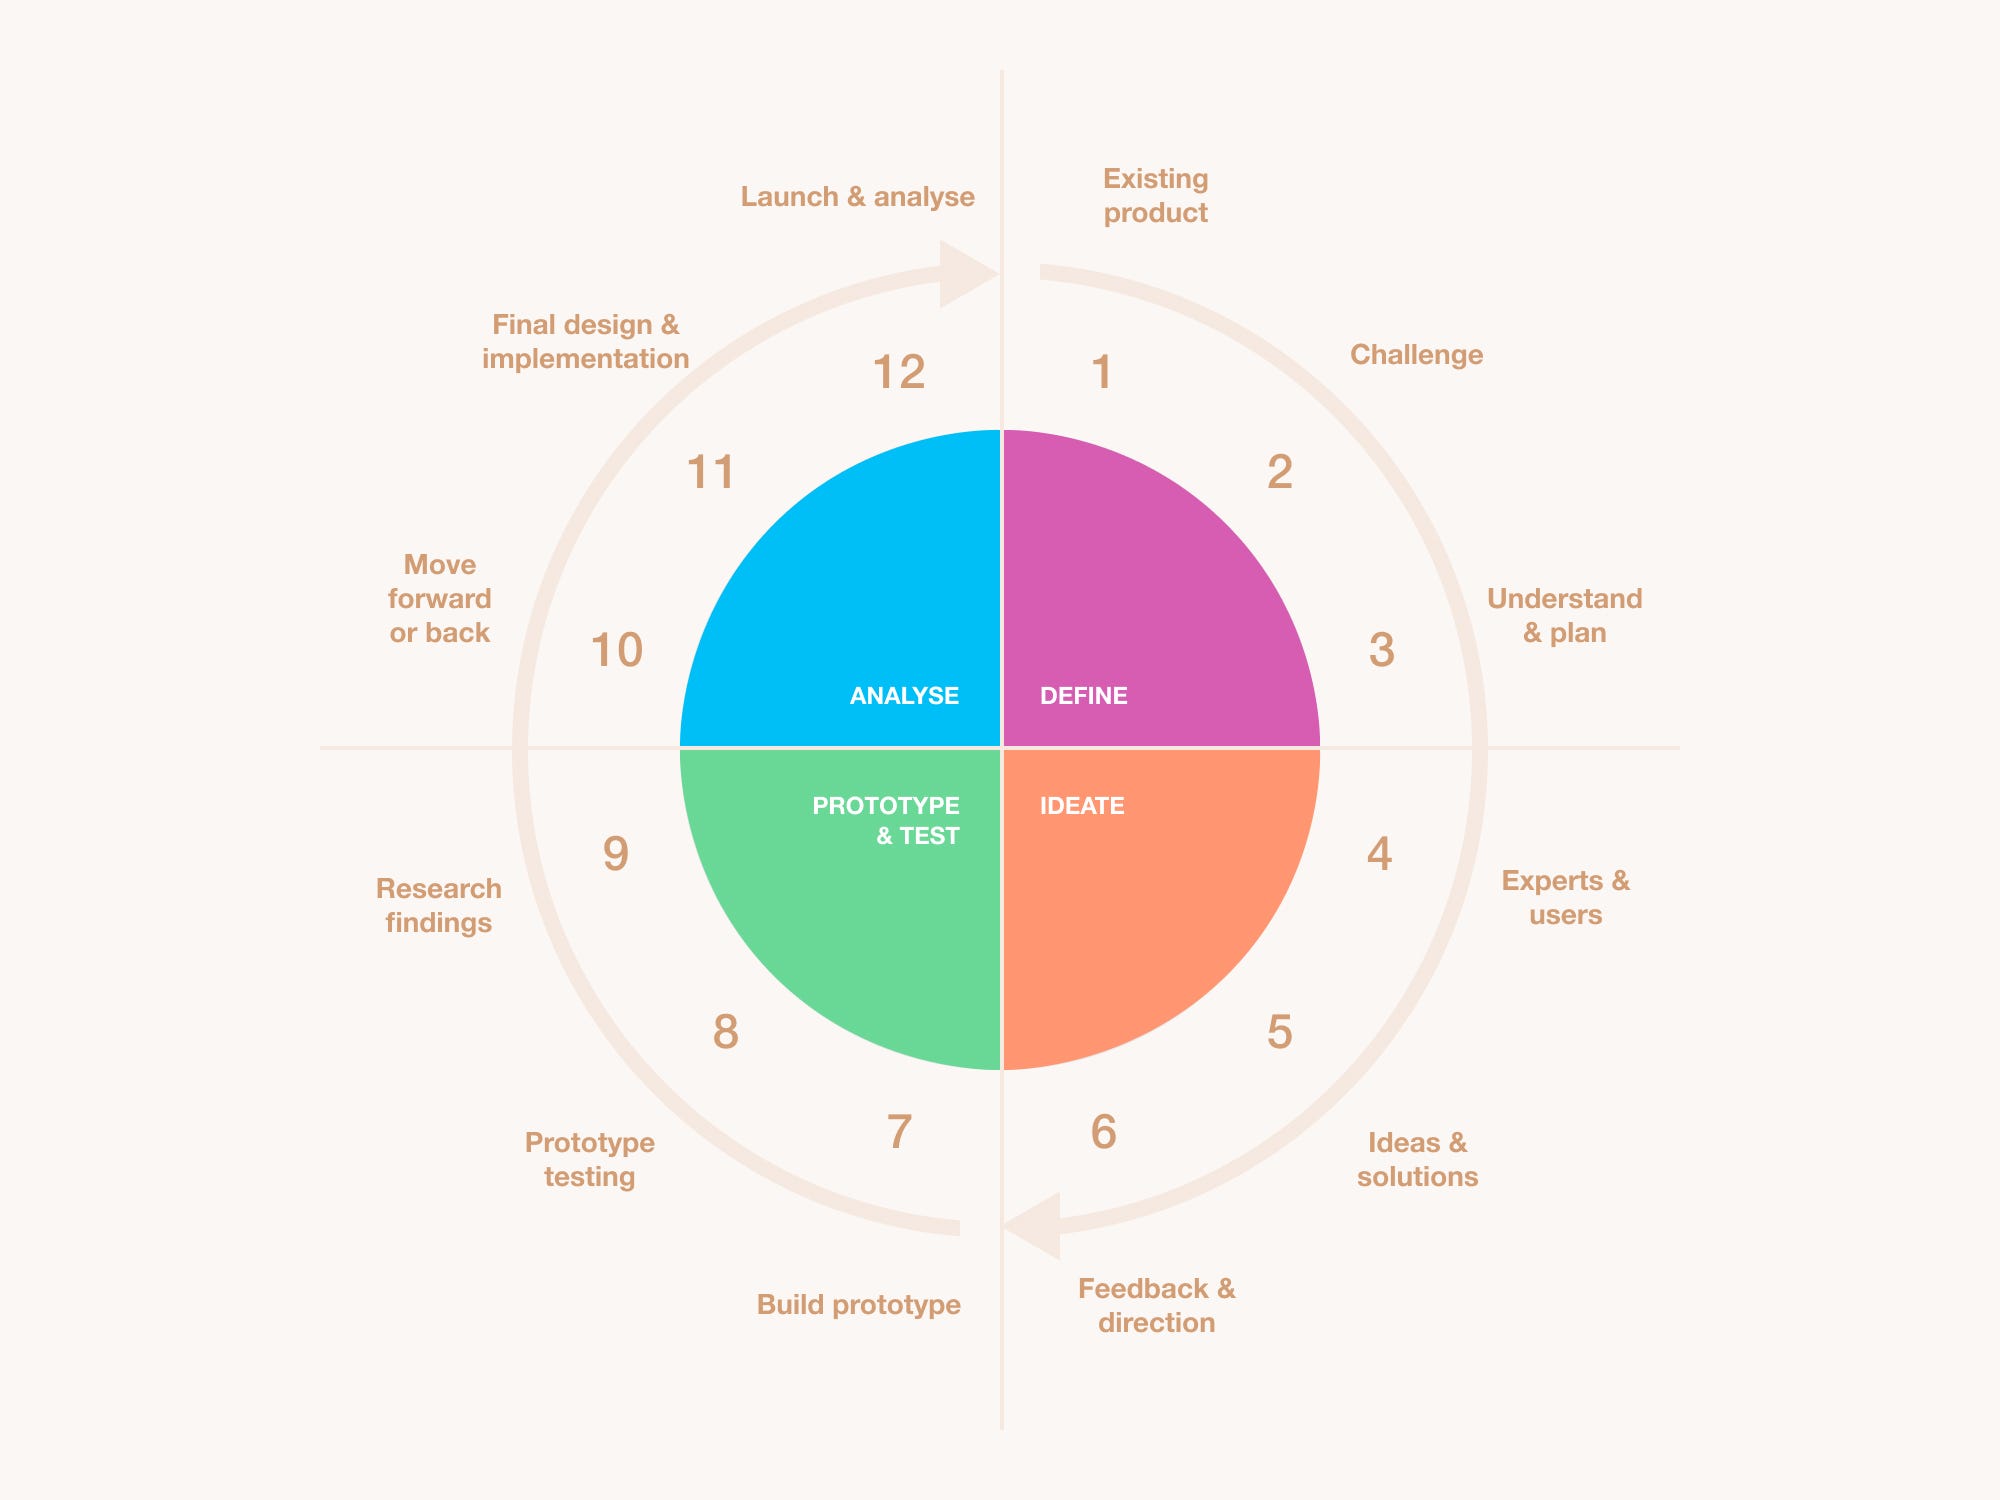
The 12-step UX designer’s journey
A detailed process for UX Designers inspired by The Hero’s Journey.
The UX/Product Designer role has evolved past simply designing solutions in a silo. To build the best solutions we know Designers should be involved throughout a project's lifecycle & work cross-functionally. We all know at a high level a design process looks like this: define, ideate, prototype, & test. It serves its high-level educational purpose but doesn’t include the cross-functional aspect or provide enough detail & guidance to do the actual job.
UX Designers have a lot to consider & think about at each stage. It’s important not to miss something as it will have a negative effect later on down the line. This may be something that impacts the end product, user experience, or a business function like engineering or even design. For example, if you forget to define your strategy for accessibility, your customers may not be able to access the product on their preferred device, engineering won’t know which devices need supporting & designers won’t have constraints to consider & work with.
With all of the above in mind, I wanted to create a cross-functional design process with enough detail for UX Designers to follow & use as guidance.
The UX Designer’s Journey
If you enjoy writing stories you have likely heard of the Hero’s Journey. It outlines the 12 stages that many popular books use to tell a story. I realised it also works well for breaking down a project’s journey starting from the existing product to launching & analysing improvements. The Hero for this story is the UX Designer.

1. Existing product (Ordinary world)
The UX Designer’s everyday life where we learn crucial details about the product, its true nature, capabilities & outlook for its customers.
The current state of the product & business before any changes are even considered. Everyone in the office is working in their usual way, it’s an ordinary day. For a Designer, this is a chance to concentrate on work that is hard to accomplish during a project with tight deadlines.
- Generative research to find opportunities & new insights
- Evaluative research to find pain points & joy
- Present research to the team (presentations, reports)
- Add & prioritise tasks to the design & research backlog
- Update the Design System (update components, document guidelines, etc.)
- Educate the team on all things design
- Assist product direction (strategy or hypothesis workshop, discussions, etc.)

2. Challenge (call to adventure)
This disrupts the comfort of the existing product & presents a challenge or requirement.
Depending on how your team works & is managed the challenge may come in many forms. The size of the challenge will also vary & can be big, small or somewhere in-between, very focused or more open-ended.
- Pick up the next backlog item
- A meeting to discuss a business goal (improve a KPI, metric, etc.)
- A meeting to discuss a business idea
- Note down assumptions & questions, add to the research backlog (this should happen throughout a project)

3. Understand & plan (refusal of the call)
Although the UX Designer may be eager to accept the challenge or requirement, at this stage they will have questions that need answering.
Decide on the strategy moving forward, what questions need answering, & what needs to be considered. Start by deciding on a design method to follow:
- Design sprint (large high-risk challenges, quick validation, business ideas)
- Lean UX Design process (large to medium challenges, business goals)
- Ideate, prototype, test (small challenges, backlog items, tweaks)
Depending on the method chosen & size of the challenge the following steps may not be relevant or happen in a different order. Next start asking questions & running exercises to deepen the understanding:
- What is the purpose of the project or task? If unknown, run a business outcomes exercise.
- Who are the users/customers? If unknown, run a proto-persona exercise (need validating later on)
- What problems are we solving? If unknown, run a user outcomes exercise
- What does success look like to both the business & the customer? (business & user outcomes)
- What tasks are critical to accomplish? Run a quick user mapping exercise (users left, goals right, text & arrows in between).
- Has this challenge been attempted before? (existing research, outcomes)
Then find out the questions the design needs to answer:
- What would cause this project to fail?
- Turn the answers into How Might We questions
- Define the design criteria checklist. (specific enough to guide the project but open enough to explore ideas, look at research & problems)
UX Designers also need to at this stage start laying the groundwork for accessibility & inclusivity. Make sure to discuss, consider, & plan:
- Supported devices, software, & hardware
- Supported versions of the above
- Consider multiple cultures & diversity (if global) & what may be impacted (appropriate timing, colour usage, language, etc.)
- Include these rules in all tasks created for the project (easily forgotten about & overlooked)
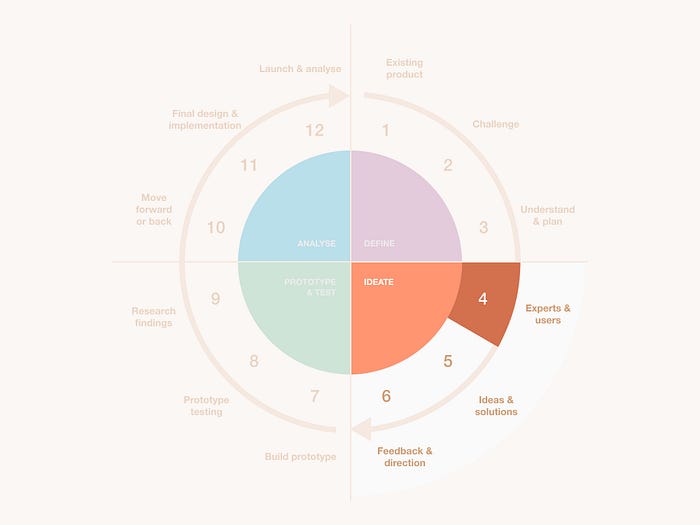
4. Experts & users (meeting the mentor)
Whatever the experts provide the UX Designer with it serves to dispel their current understanding & give them the strength & knowledge to begin designing.
The business's knowledge is divided between the various functions, it’s the UX Designers' job to bring it all together. Each function is an expert in a certain area, the customer, technology, marketing, business, etc. In the end, UX Designers will have a full cohesive view of the problem or opportunity & not just their own perception.
Nobody knows everything - Jake Knapp (Design Sprint)
Set up 15-minute meetings to run through the challenge & plan with:
- Project leads/deciders
- Marketing
- Sales
- Customer support
- Engineering
- Research
- & more…
Use questions to get the information needed, for example:
- What will make this project a success?
- What’s our unique advantage or opportunity?
- What’s the biggest risk?
- What would cause the project to fail?
- Walkthrough previous planning & exercises, get their input
The challenge may require upfront research to find opportunities or existing product issues. For example, if the challenge is a business goal to increase checkout conversions. If so:
- Generative research to find opportunities & new insights
- Evaluative research to find pain points & joy
- Present research to the team (presentations, reports)
Great UX Designers can synthesis all of this information into the best solution.

5. Ideas & solutions (Crossing the threshold)
The UX Designer is now ready to act upon the challenge & truly begin building a solution.
Whether as a group or alone this stage remains relatively the same. If in a group it is better to follow the philosophy of together alone. Meaning the louder voices & senior positions don’t overpower the group thinking. All of the exercises should be done alone & anonymous without discussion including reviewing & voting.
Start by finding inspiration, it doesn’t have to be from the product's domain. Users also prefer interactions & patterns learnt from other products, especially products they use often. Use another exercise like Lightning Demos (in a group or solo):
Once inspired, review all of the information collected so far. UX Designers should be full of ideas at this point.
- Sketch ideas
- Use crazy 8’s or six up (explore/iterate an idea)
If struggling to exhaust an idea use the SCAMPER method of questioning:
- Substitute: What can be substituted without affecting the process?
- Combine: Can we merge two steps of the process?
- Adapt: How can we make the process more flexible?
- Magnify: What if the product is double the current size?
- Put to another use: Can we recycle components or interactions for another use?
- Eliminate: What would happen if we removed this part?
- Reverse: What would happen if we reverse the process?
Review, vote (if in a group), & decide on the best ideas to create the:
- Solution sketch
- Navigation (site-map)
- Task flow
Finally, to ensure there are no gaps in the solution create a detailed storyboard using the rough map from stage 3 & the solution sketch. For example, a recent project uncovered the need for social media ads & follow up email templates. A lot of the time the focus is purely on the product, the core part of the journey & not anywhere else.
Story mapping
At this point, it may be worth running a story mapping session to break the idea up & determine the MVP (Minimal Viable Product). Especially, in an Agile Sprint environment where work is iterated over. As the UX Designer, ensure the usability is not severely impacted, minimal doesn’t mean unusable… Try to enforce the idea of an MUP (Minimal Usable Product). Depending on how the team works story mapping could also happen once the idea has been validated using a prototype.
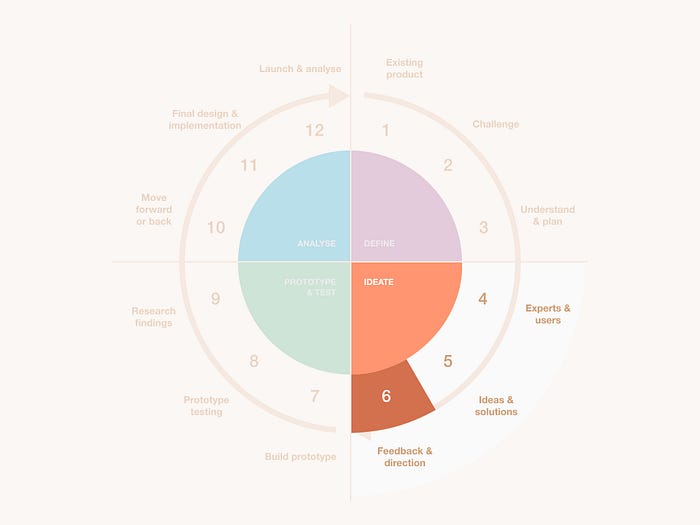
6. Feedback & direction (tests, allies, enemies)
The UX Designer must overcome feedback & critique presented with on the journey towards the final solution.
During a cross-collaborative workshop, the best ideas are voted on & the direction decided, for example, during a Design Sprint. If however the solution has been designed by the UX Designer only, they will need feedback from the various stakeholders.
- Project managers/deciders (meets the spec? Gives approval)
- Engineers/tech (technically possible? compatible with supported devices?)
- & more… (depending on the challenge)
During a review, the UX Designer needs to sell the solution through a presentation. Think about:
- Setting the scene, who are the users, what is the scenario, what has to be true, how did they get here?
- Run through the prototype as the customer
- Don’t miss secondary paths & details like notifications, loading, errors, etc.
- Every design decision should be justified, try to use evidence
- Takedown notes preferably where they can see it (for example, InVision comments)
- If in disagreement argue your point professionally, if they continue to push then take it down as a note & say you will look into it (A/B test if necessary)
- All critique is valuable, don’t flat out disagree, don’t take it personally
Sometimes it may take a few iterations to get past this stage, especially for large technical problems. Ultimately, it’s down to the decider/s to give the go-ahead. Once this has been acquired start recruiting participants for user testing/validating the solution. Unless using a 3rd party recruiting service or panel.
- Try to find 6 - 7 participants to account for potential no-shows
- Book an hour for each session in the calendar (if moderating)
- Allow time between sessions (15-30 mins)
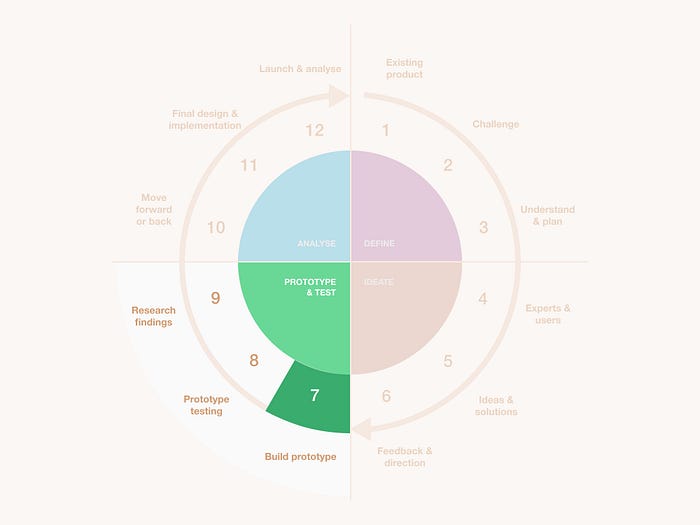
7. Build prototype (approach to the inmost cave)
Final preparations are made before taking that final leap into validating the solution.
It’s important to distinguish a prototype from a fully completed design spec to be handed over to developers. At this stage, we are looking at the former. This means creating a Minimal Viable Prototype at a strong enough fidelity to obtain the validation needed. First, decide on the fidelity & prototype:
- Paper (low-fi)
- Wireframes (low-fi)
- Visual design (high-fi)
- Dummy data (coded)
- Landing page test (coded)
- Feature fake (coded)
- Wizard of oz (coded)
- Fully functional (coded)
Next, decide on the roles required to build the prototype. Sometimes this falls entirely on the UX Designer but ideally, there would be a mixture of skills.
- UI Designer
- Graphic Designer
- Copywriter
- Asset manager
- Developer (if coded)
Use the correct tool for the job:
- pen, paper, scissors, glue, etc. (paper prototype)
- Balsamiq (wireframing)
- Sketch, Figma, Studio, InVision (visual design)
- HTML, CSS, JS (coded)
- & many more…
If the prototype is either coded or a high-fidelity, follow best design practices & guidelines:
- Consistency & components
- Hierarchy & contrast
- Simplicity, proximity, target size, & many laws
- Responsiveness (if testing multiple devices, otherwise choose one platform come back to the others in step 11)
- Feedback (keep users informed)
- Tabbing orders (if coded, otherwise wait till step 11)

8. Prototype testing (ordeal)
Experiencing the performance of the solution with customers grants greater insight that’s necessary in order to reach the journey’s end.
With the prototype in hand, it’s time to start the validation process. Ideally, this will also include a 30-minute discussion with the participants. First, start by gathering all of the project’s assumptions, questions & prototype then build a plan & script. Think about & include:
- The purpose of the research & method chosen
- What needs to be learnt (assumptions, questions, prototype features)
- Check the research backlog for relevant assumptions & questions (if the script is short)
- Who the target participants should be (all users impacted, novice vs advanced, diversity, uniqueness)
- How success will be measured (task success, time on task, error rate, satisfaction, etc.)
- Screener questions & compensation
Then start to write the script, think about:
- An introduction to set expectations
- Acquiring their consent & providing compensation as a thank you
- Avoid leading, closed questions or introducing bias, use relevant questions for the audience
- Prioritise questions & tasks (highest to lowest value)
- Write each task without bias & order in a way to prevent bias
- The goal of each task & what to observe
- Lack of questions? If time permits run broader research (surveys, observational note-taking, etc.)
Before running the participant sessions perform a dummy run with a colleague, if possible. This will help to uncover hidden issues with the script & ensure the session meets the time available.
By this point, the participants have been booked in, the prototype & script is ready. All that is left to do is run the sessions, ensure:
- The participant is at ease & warmed up through professional friendly discussion (offer a drink, ask about their day, can back out anytime, etc.)
- Check if the participant has any questions/concerns
- Embrace the silence, give the participant time to think, add more detail, etc.
- Probe into answers, ask why
- Don’t lead on tasks, let them explore, try not to help
- Handle participant questions, use boomerang answers (what do you think?), rephrase the task if necessary (don’t introduce bias though!)
Wrap up each session by allowing the participant to express any remaining thoughts & explaining to them the next steps. You could also ask them to complete a post-test questionnaire to capture:
- Net promoter score (NPS)
- System usability scale (SUS)
- Additional quantitative data
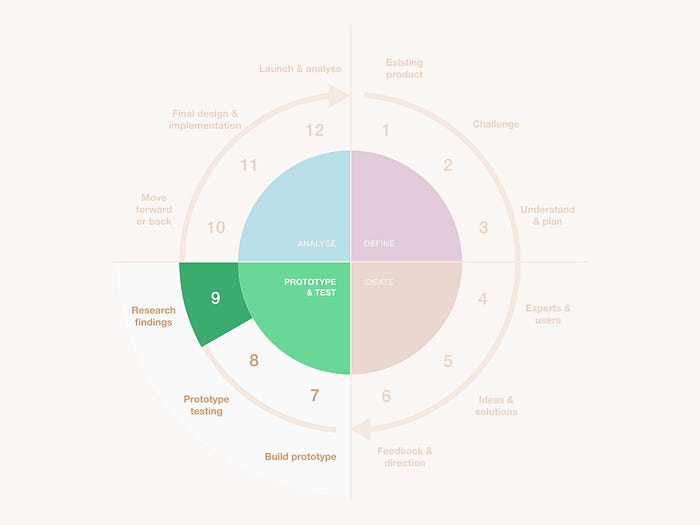
9. Research findings (seizing the sword)
The Reward may come in many forms: problems, greater knowledge or insight, or even validation.
Document the findings from the previous step to guide the project forward & to refer back to if the research is useful in future challenges. Use the same document as the research plan & script, this way you don’t need to explain the project again & everything is in the same place (prevents others needing to jump between docs). Include:
- General overview/summary (visualisations, net promoter score NPS, system usability scale SUS, etc.)
- Which assumptions & questions were answered (provide evidence, update the central knowledge bank if one exists)
- Individual task stats (average task success & error rate, time on task)
- What worked well
- What caused problems
- Product defects (if coded)
- Recommendations
When writing the findings ensure to:
- Write the important info first, summary, recommendations, etc.
- Write to your audience & what matters to them (project manager or team, researchers, marketers, everyone, etc.)
- Include evidence (video clips, manuscript, etc.)
- Watch out for findings that conflict, including other project research (may need further exploration)
- Be clear & avoid miscommunication
- Explain what can be done with each new insight
- Protect your participant’s personal information (unless consent is provided)
If possible, involve the project team with the research. This can be done by using team members as note-takers, either while watching in real-time (anonymously), a recording or in person (1 at a time). This way the team can understand first hand rather than second hand via a report. As an added bonus I also find it motivates the team.
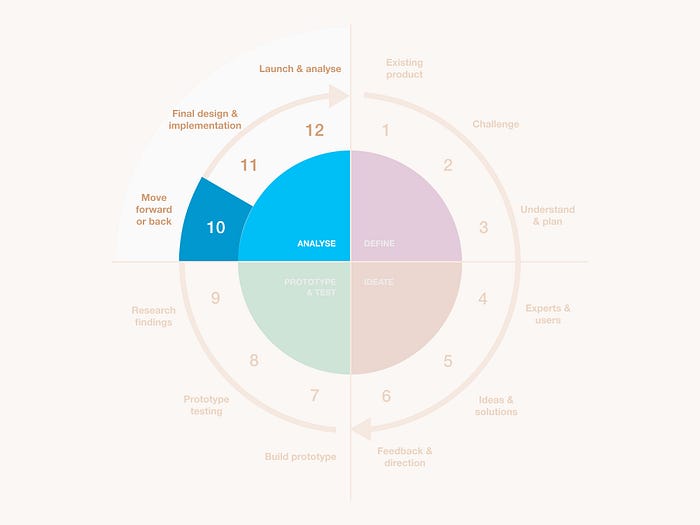
10. Move forward or back (the road back)
The journey is not yet over & the solution may still need updating based on its performance.
At this point, there are a few different directions that can be considered depending on the results of the test. The best-case scenario is that the solution was valid & requires some minor tweaks & updates. Worst case the solution failed.
Design should have the permission to fail — Lean UX
Take the recommendations from the research findings & either:
- Update the validated solution to better serve users based on the findings, usually, there are small tweaks that can be made (re-validate using an unmoderated user test to save time)
- Partial validation will require going back to step 5 to generate new ideas for the parts of the prototype that failed
- If the prototype failed entirely then take the findings & recommendations to re-evaluate. Do users actually need this? Can the solution be better? Use the research to understand & decide whether to go back to step 5 (ideas), rephrase the challenge & understanding, or move on to the next challenge
Set up a meeting with the team to present the research, test results & updated prototype. Make your recommendations & suggest a direction (one of the 3 above). Going backwards is always the hardest to gain support for, unfortunately, it is perceived negatively & in the age of sprints there usually isn’t enough time… Use the research findings to explain why from both a business & user perspective it would be better to go back. Ultimately, it is up to the decider on how to move forward.
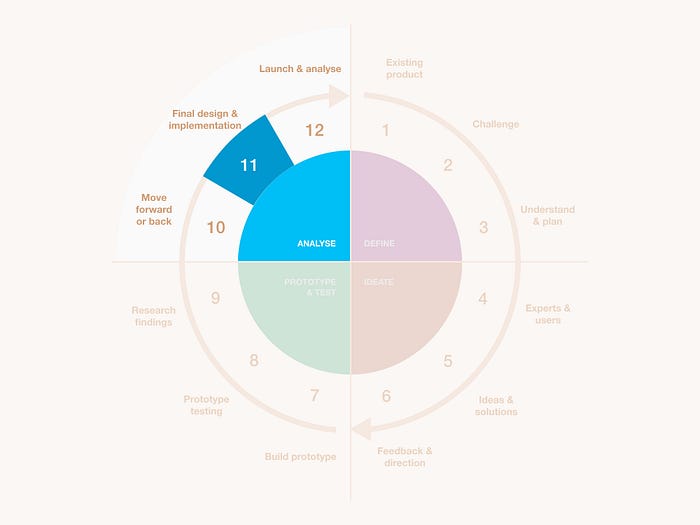
11. Final design & implementation (resurrection)
The design will have far-reaching consequences to the existing product & the work of the engineering team.
With the solution approved & validated the design can be finished to include anything that wasn’t required for the prototype & information developers need to know but can’t interpret from a visual design:
- Responsiveness (devices, accessibility, screen size)
- Tabbing order & scroll behaviour (accessibility)
- Unique pages (404, terms of service/privacy pages, etc.)
- Empty spaces & onboarding/help
- Browser favicon & default images
- Loading, error, & success states (allow time for users to react & take action)
- Hover & focus states
- Animations & transitions (don’t make them slow & avoid flashes)
- Target sizes (buttons, links, menu items, etc.)
- Final copy & alternative text for media (images, video, audio), collaborate with copywriters
- Consider a secondary calmer colour palette that doesn’t use vivid colours (if necessary, reduce distractions & anxiety, use a colour mode switcher on-site, accessibility)
This is also the time to start thinking about how the new product/feature will be measured to determine its success & ongoing improvement. Build a measurement plan & ensure developers apply the correct tracking code. Think about:
- The business or project objectives
- The strategy & tactics to support the objectives
- The KPIs that need to be tracked
- The interactions that need tracking
- Conversion funnels
- 3rd party applications (Hotjar, Google Analytics, etc.)
- Micro vs macro goals
- Create a tracking task for developers to implement
Developers by this point being involved in the journey should have a good idea of what they need to implement. Ensure they can easily access & understand the prototype & accompanying assets. It helps to present everything in a meeting so that questions can be asked if there is any confusion. Remain available to developers to help resolve any issues that come up throughout implementation. Sometimes minor tweaks need to be made to the design.
Periodically review the implementation as it is being built to ensure it is on the right track & matches the design spec. Ensure there is a task to perform a final review of the finished implementation. Designer sign-off should be required! In this review:
- Check every page & it’s various states on all the supported devices (visually)
- Confirm alternative content on images, videos, & audio
- Use a keyboard-only, screen reader, braille reader, etc. (if available)
- Check target areas, hover & focus states
- Confirm animations & transitions are correct
- Run a contrast & font-size analyser
- Ensure all notifications are understandable, especially error messages
Don’t rely heavily on the quality assurance team to notice design & accessibility issues unless trained.
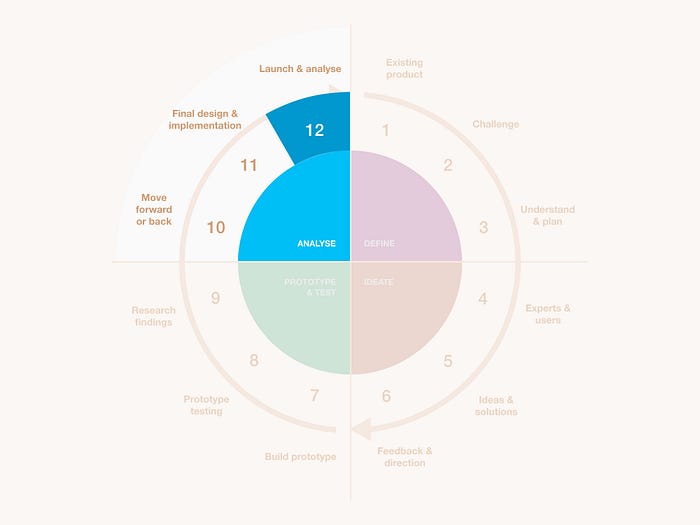
12. Launch & analyse (return with the elixir)
A direct solution to the problems or perhaps a new perspective for everyone to consider.
Once the developed solution has been quality tested & launched the product is now in a new state. It has changed from stage 1, hopefully for the better. It’s now time to allow it to collect data, depending on its determined frequency of use & user base size this may take weeks or even months. Once it has had the time, create a report or presentation to:
- Confirm the project's value (time & money invested, the business value generated/conversions/profit, etc.)
- Analyse the business goals/KPIs (Achieved? A step closer or back?)
- Analyse the micro & macro goals defined in step 11 (what’s working & not working?)
- Analyse the conversion funnel, is there a high number of drop-offs at a certain step? or steps?
- Analyse the basics (acquisition, engagement, bounce rates, events, etc.)
- Triangulate multiple data points to provide greater understanding (usage data, heatmaps, existing research, etc.)
If the results come back negatively it may be worth performing a retrospective to understand what went wrong, what could have been done better.
If the results have moved the team closer to the overall goal or KPI & provides evidence for improvements. It may be worth spending time strengthening these areas. This may help push the project over the line. Otherwise, add the insights into the backlog & pick up the next challenge to continue pushing towards the overall business goal.
Have your say
This is a living process & I’m sure it will change/evolve over time. No doubt I’ve missed things, UX Designers have a wide range of skills & are involved throughout the project journey. Does this process mimic roughly your own process? What would you change? Or add? What have I missed? Let me know in the comments!