Part 2/2
The master ideation toolbox
10 tools to unleash creativity from anyone.

This post is the follow-up to my first article on the topic (part 1), which uncovered the initial 5 ideation tools out of the 10 completed below.
This article aims to round up the reviewed collection of my favourite online and offline ideation tools. In addition to tips and tricks for each technique based on my experience, I aim to share guidance with the remote set-up such as providing template inspirations to inform your custom layouts as well as pointing to available resources for immediate use. Let’s quickly recap the first 5 ideation tools previously explored in Part 1:
1) S.C.A.M.P.E.R. ⚙️
2) Crazy 8’s 💥
3) Mash-up 🎨
4) Round Robin 🔄
5) Random Word/Image 🌃
Now let’s have a look at what’s up next!
6) Alternative Worlds
📝 How it works
Step 1) Every participant or group receives a prompt from the facilitator. The prompt is related to leading, outstanding brands in their sector (i.e. Google; Starbucks; Apple; Nike, Tesla, etc.) and aims at challenging participants with the following questions: How would brand X solve the challenge? What can you learn from brand X to come up with a strong solution or make your current solution stronger? The prompt can be assigned to participants via custom cards/layout; post-it or just verbally.
Step 2) Every participant/group is asked to sketch a solution responding to the prompt in 7 minutes.
Step 3) Time to share plenary! The facilitator will make sure to moderate feedback sharing for each idea generated. Valuable to mention as part of the critique is the list of principles/driver that participants extracted from these outstanding companies, to serve and inspire their solution.
💡 Tips
- Preferable to assign a different brand per group/participant, to ensure variety and greater richness of output. Up to the facilitator to pick and prepare a series of ‘alternative worlds’ worth exploring given the specific challenge at hand.
- Make the prompts engaging, it will help participants to emphasise with the ‘alternative world’ you’d like them to think through. (That’s why custom cards or visuals are an extra effort that usually pays off).
- The combination with role-playing (i.e. I am Google, You are Apple, etc.) can be a fun and effective way to increase the level of immersion into the ‘alternative world’ in question, especially during pitching back.
🚨 Red flag
If you go for a low-fi set-up without solid visuals or storytelling, make sure to pick well-known references or the result will be not as effective.
🎯 When to use it
It broadens up the angle when looking at your challenge, preventing the team from considering ONLY the specific sector and market you are in. It triggers the reflection around other key players in other industries that can unlock interesting applicable thinking!
💻 Online adaptation
Below is my Mural set up for this exercise as a reference to inspire your custom adaptations.


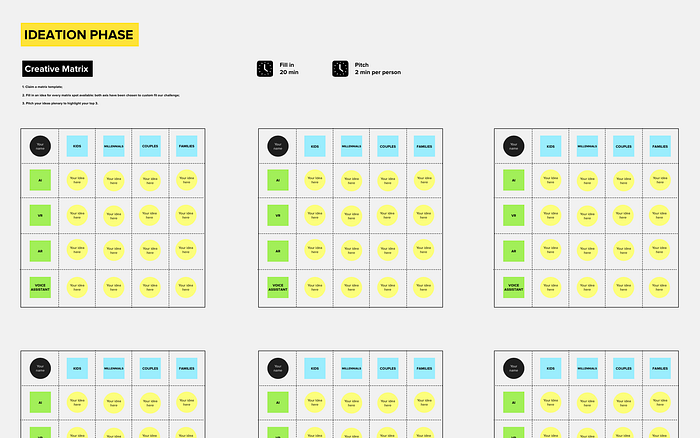
7) Creative Matrix
📝 How it works
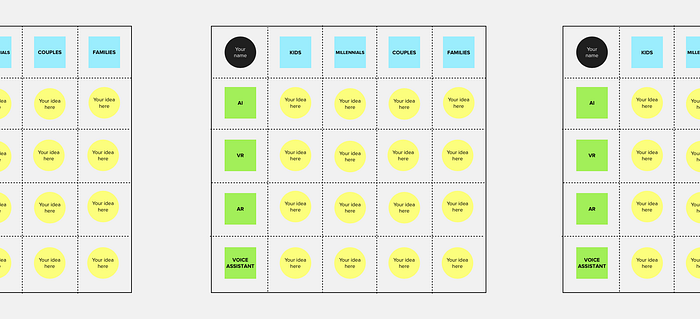
Step 1) The creative matrix template is essentially composed of a grid. For each column, there’s one particular customer segment (existing or new), while for each row you dedicate an additional constraint that could be tight to technology (i.e. AI; VR; AR, etc) or any other theme/criteria.
Step 2) The goal of the exercise is to fill in every spot resulting from the (usually) 5x5 matrix, with a sketch or text, either directly into each spot of the grid or by placing a post-it per spot, the way you go better, in 20 minutes.
Step 3) Once all the templates are filled, either review each outcome by exposing the papers in ‘gallery view’ silently or ask each participant to briefly pitch the top 3 matrix outcomes.
💡 Tips
- To increase motivation, you could approach this exercise as a game and assign one point per idea. The person that completes the higher number of ideas combinations — therefore with the higher score — will be the winner, who could get a small symbolic prize, for example.
- 5x5 is the ideal matrix size, but feel free to be flexible and reduce it in case of fewer customer segments of interest.
🚨 Red flags
- In case you are working on a challenge already narrowed down to a specific customer segment, the exercise as it is might not be the best fit. However, you could try to change the ‘customer segment’ category with any other driver relevant to your context (i.e. geolocation; trends; etc.)
- I would be mindful of increasing the matrix size, not to lose focus where it truly matters, and not to turn the exercise into a headache.
🎯 When to use it
- Fast generation of multiple ideas, at once;
- Comprehensive exercise, looking at many customer segments and drivers.
💻 Online adaptation
Below is my custom Mural set up for this technique as a reference or feel free to check out and use this template available in Mural (in collaboration with LUMA INSTITUTE).
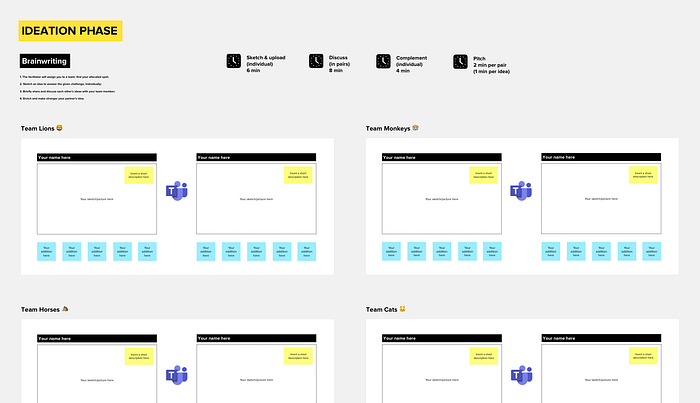
8) Brainwriting
📝 How it works
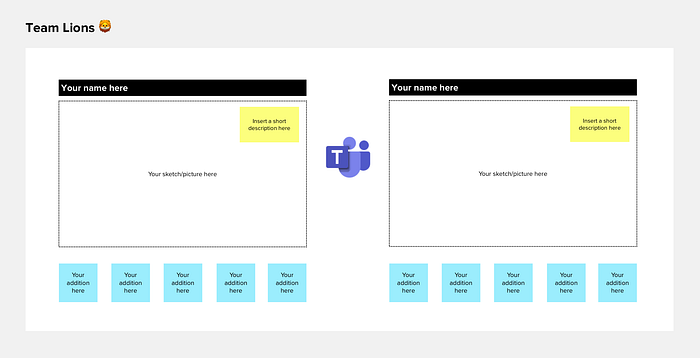
Step 1) I’ve seen several ways out there to approach brainwriting, but all I noticed these versions having in common, is easing more shy team members in the ideation process by creating a safe environment for them to share and express their ideas. This version I use starts with splitting the team into pairs (self-initiated; pre-assigned or by a little fun ritual).
Step 2) Let everyone — individually — come up with a solution sketch to the challenge in question in 6 minutes.
Step 3) After individual sketching, the pairs get the chance to review each other’s ideas and ask each other’s questions to clarify potential doubts, all in 8 minutes.
Step 4) Sketches will be swapped and every other member of the pair will have the chance to complement the received idea to make it stronger, in 4 minutes.
Step 5) Plenary pitching time follows!
💡 Tip
If you are handling a big group, you can extend the team to 3, but that will mean extra time for clarification & refinement, so keep in mind that time will stretch automatically.
🚨 Red flag
Brief the team on the importance to use a clear handwriting and simple way of communicating the ideas while sketching (the sharing time is limited, so sketches are better to be clear).
🎯 When to use it
- Shy team members get a safer, 1-on-1 environment to communicate their ideas and open up;
- Participants struggling with idea creation but that are better at refining and building on top of existing concepts, get the chance to shine in this one.
💻 Online adaptation
Below is my custom Mural set up for this technique as a reference or feel free to check out and use this template available in Miro.
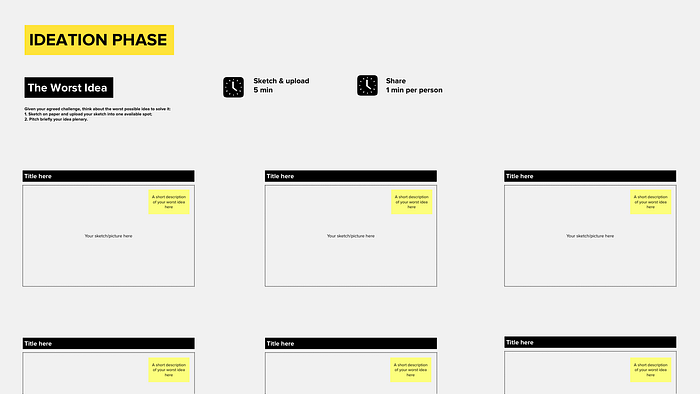
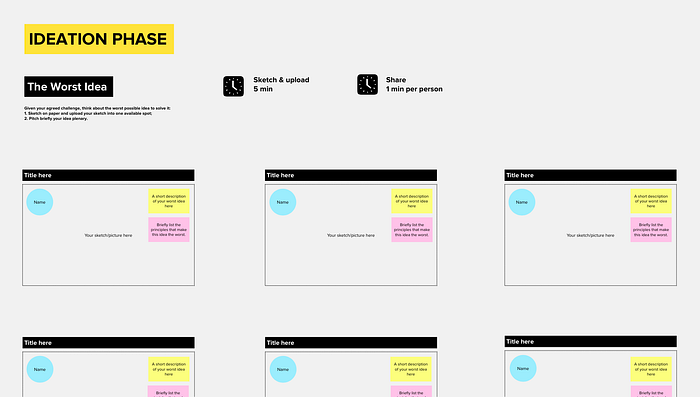
9) The Worst Idea
📝 How it works
Step 1) Defining what your end solution must NOT look like or do is equally important as knowing what the ideal solution must enable and embody. This is exactly what this technique will allow you and your team to figure out: what to avoid; what to prevent; which risks to stay away from or watch out for. All done with a smile while embracing the most pessimistic scenarios.
Step 2) After sharing these premises and brief, the facilitator asks each participant to sketch the worst solution possible to the given challenge in 5 minutes.
Step 3) By following a round of crisp pitching of each result, the facilitator can spot patterns and extract some ground rules to guide the team in envisioning great ideas going forward instead.
💡 Tip
If coming up with the worst idea for your challenge straight away might feel quite a jump, start by using a more relatable, easier, and simpler use case (i.e. What’s your worst idea for walking your dog? What’s your worst idea for eating at the restaurant? Etc.). This will ease participants into the technique to be able to perform better later.
🚨 Red flag
You are hardly going to have solid ideas out of this exercise: It is more a step to trigger the mind and analyse the drivers, values, and consequences of a potential solution. So if you have not much time and need for tangible results straight away, then this might not be the best pick.
🎯 When to use it
- Fun sketching warm-up;
- Enhances the team’s alignment. It’s a reflective exercise that aims to clarify a shared common ground when it comes to principles and elements the end solution should incorporate or stay away from;
- Brings in an interesting, critical thinking driven perspective that truly benefits the ideation rounds usually following after.
💻 Online adaptation
Below is my Mural set up for this tool as a reference.
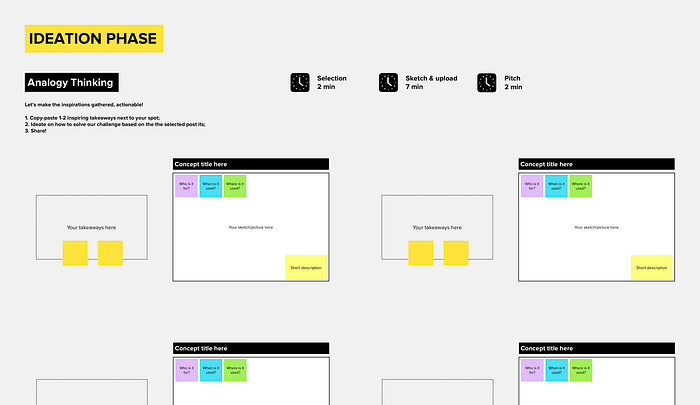
10) Analogy Thinking
📝 How it works
Step 1) Getting inspired by great existing solutions is a key asset of the creative process, and what makes the difference between copying and reframing creatively is exactly on how you process and leverage such inputs. Analogy Thinking — I’d say a variation of the ‘Mash-Up’ technique showcased in part 1 — is a very nice way to help you digest and repurpose promising nuggets of coolness happening out there, to your cause, and your challenge. I usually use this exercise right after and inspiration session: Lightning Demos in a Design Sprint or any other format with this objective. During the inspiration session, I ask participants to capture on post-it’s key insights and interesting pieces of content that got their attention.
Step 2) As part of the Analogy Thinking exercise, ask each participant individually to select 1 to 3 insights captured on post-its, and to place them on the allocated template’s spot, in 2 minutes.
Step 3) The goal is to come up with a new idea to solve the challenge at hand, somehow inspired and framed by those selected inputs, in 7 minutes.
Step 4) Review everyone’s outcomes and share feedback.
💡 Tips
- Pick inspiring case studies in a broad sense, from your specific field to completely different domains. The wider and diverse the range, the better the outcome of the ideation session.
- Try multiple rounds for a higher range of insights combinations.
🚨 Red flag
Communicate to participants how the inspiration session is going to evolve and what the exercise will entail. This will give them extra motivation to stay focused as well as pressure to capture input on post-its.
🎯 When to use it
Great way to make the content of an inspiration session immediately actionable. Often you gain momentum, you feel incredibly inspired as a team, but no further action is taken: this exercise facilitates the translation of the inputs gathered into potential solutions, right away.
💻 Online adaptation
Below is my Mural set up for this tool as a reference.

And we got to the end of this collection! I hope this hands-on review of how I have been approaching ideation both offline and online can sparkle some inspiration and serve as guidance for your next upcoming workshops. Facilitation, as well as design methodologies, are ever-changing domains and so many variations and personal tweaks are possible when it comes down to tools. In this regard, I would love to flip the conversation back to you and ask: What’s your favourite online ideation tool? Do you have any tips and experience to share?
Would love to hear in the comments below!
Thanks for reading! 💛 If you have feedback to share, feel free to say hello 👋🏽

