Member-only story
How to use and reuse everything in SVG… even animations
Build and optimize SVG and CSS animations.

Link a la versión en español.
If you are familiar with SVG and CSS animations and started to work with them often, here are some ideas you might want to keep in mind before jumping into the job. This article will be about learning how to build and optimize your code with <use> element, CSS Variables and CSS animations.
Part 1: The SVG <use> element
If you are a developer that likes to keep your code DRY or a big fan of Sass/CSS variables, there is a good chance that you will like this tag.
Let’s say you have an element that is repeated many times in your graphic. Instead of having a complex part of your code repeated many times in your SVG, you can define this part once and then clone it somewhere else in your document with the <use> element. This will not only reduce an enormous amount of code but also will make your markup simpler and easier to manipulate.
To start implementing the <use> element, go to your SVG and follow these steps:
- Identify the part of the code that you want to clone
- Add an ID to that part
- Link it inside your
<use>tag like this:<use xlink:href="#id"/>
That’s it! Your new clone is ready, now you can change its attributes (e.g. x and y position) to fit your needs.
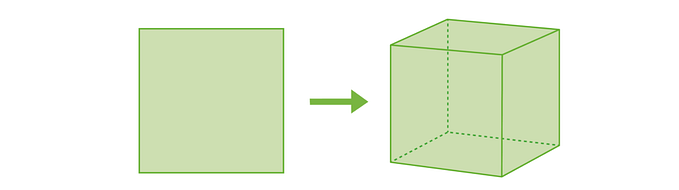
Let’s dive into a very convenient example
I want to share this real case where I needed to animate a big cube made of little cube units. (Imagine the classic Rubik’s Cube.)
We’ll start by drawing the cube unit in SVG using basic shapes and transforms:
<svg viewBox="-130 -20 300 100">
 <g id="cube">
  <rect width="21" height="24" transform="skewY(30)"/>
  <rect width="21" height="24" transform="skewY(-30) translate(21 24.3)"/>
  <rect width="21" height="21"  transform="scale(1.41,.81)   rotate(45) translate(0 -21)"/>
 </g>
</svg>